If I Have Already Voted Do I Need to Register Again
Go started with Keplr Browser Extension
*In this tutorial we'll use $Cantlet every bit case, but the process is applicable for all integrated tokens equally
⭐️ Cosmos ($ATOM)
⭐️ Kava ($KAVA)
⭐️ Secret Network ($SCRT — $sSCRT)
⭐️ Cyber Euler-6 ($EUL)
⭐️ Straightedge ($STR)
⭐️ Akash Network ($AKT)
⭐️ Starname ($IOV)
⭐️ Certik ($CTK)
⭐️ Sifchain ($ROWAN)
⭐️ IRISnet ($IRIS)
⭐️ Sentinel ($DVPN)
⭐️ Regen Network ($REGEN)
⭐️ Crypto.com ($CRO)
⭐️ Osmosis ($OSMO)
⭐️ Persistence ($XPRT)
⭐️ IXO ($IXO)
We will besides learn how to add together mainnets available via [Propose Chain] feature such equally Oraichain, BitSong, LikeCoin, and e-Coin.

⚠️ Keplr extension is officially supported only on Chrome.
It can also be used on Dauntless, but some features may exist unavailable.
It isn't possible to use Keplr extension from mobile.
⚠️ Pay attention to the websites y'all connect your Keplr wallet with and only download Keplr from the official website or from the link you can find in this tutorial.
⚠️ No one from Cosmos and Keplr team volition ever write y'all in a DM asking to validate your wallet or type your mnemonics:
Delight be conscientious of scammers and if yous need assistance always use public channels.
You are your ain depository financial institution: aid us in assisting y'all in keeping it prophylactic.

- Get to this link and click the [Add] button
- [Add "Keplr"] window will show off.
Here you have to cull [Add together Extension] - At the terminate of the download, you can start to collaborate with your browser extension by clicking on it.
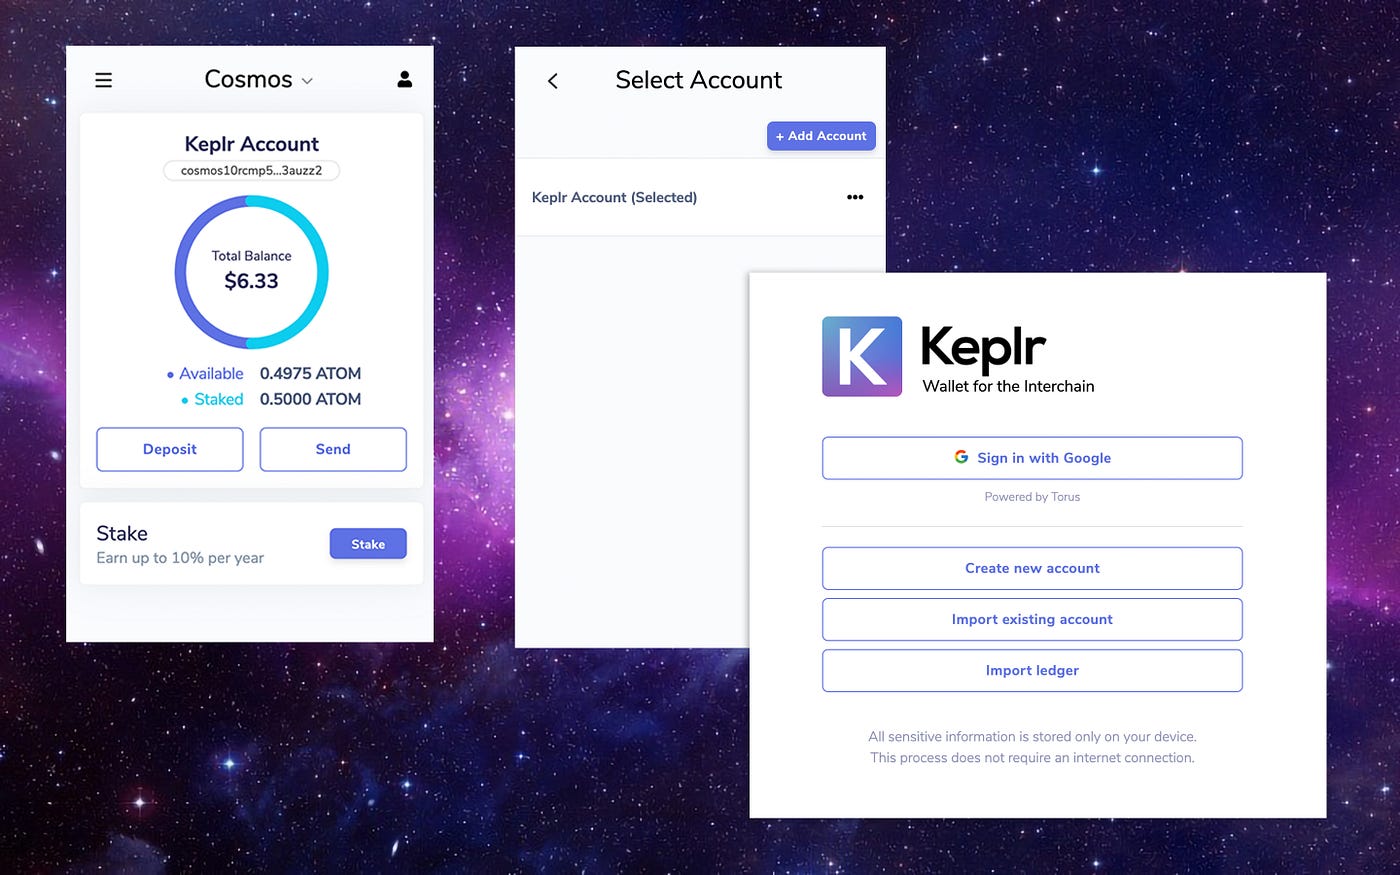
- Now you accept 4 options: import your business relationship from a compatible* non-custodial wallet, import your Ledger account, create a new account via seed/mnemonic phrase or via [One-Click Login].
*[compatible] means a wallet that allows y'all to use the mnemonic/seed phrase to import your account to Keplr.

- If you are setting upward Keplr for the first time:
In the initial pop-upwardly window, cull [Import Existing Account]
If you lot have used Keplr before:
In the extension click on the silhouette in the upper-right corner, and so the blue box [Add Account] & select [Import Existing Account] - Enter your mnemonic/seed phrase in the appropriate slot, separating the words by infinite & taking intendance to check that they are spelled correctly.
- Make sure you lot have imported the business relationship with the correct derivation path, viewable by clicking on [Advanced].
Ordinarily, the derivation path should be thou/44'/…'/0/0/0, only if you lot see that importing the business relationship via mnemonic on Keplr the creation mainnet accost displayed is different from yours, it is possible that the derivation path ends with 1 (or another number) instead of 0.
If this is the case, all you have to do is start the process over and replace the last 0 with 1.
If you are interested in knowing more than about the Hard disk drive wallet derivation path, you can find more in the Keplr FAQ , section [General Questions]. - If you have only downloaded Keplr extension, it'southward time to set your password! Choose carefully, if possible adopt a password you're not using in whatsoever other application, and and so click [Confirm].
If you have used Keplr earlier, this footstep will be skipped every bit you have already set up your password when creating/importing your first account. - Select [Washed].

- If you are setting up Keplr for the start time:
In the initial pop-up window, choose [Import Ledger]
If you have used Keplr earlier:
In the extension click on the silhouette in the upper-right corner, then the blue box [Add Account] & select [Import Ledger] - To complete the connexion with your Ledger Nano Difficult Wallet, follow the steps described in the pop-upwards that will appear (you can find a detailed tutorial here).
- Brand sure you lot have imported the business relationship with the right derivation path.
If you are interested in knowing more about the HD wallet derivation path, you can detect more in the Keplr FAQ , section [General Questions]. - If you lot have just downloaded Keplr extension, it's time to set your password! Choose carefully, if possible prefer a password you lot're not using in any other awarding, and then click [Ostend].
If you lot have used Keplr before, this step will be skipped every bit yous take already set your password when creating/importing your first business relationship. - Select [Washed].

👤 How to create a new Account via Manemonic/Seed Phrase
- If y'all are setting up Keplr for the beginning time:
In the initial popular-up window, cull [Create New Account]
If you have used Keplr before:
In the extension click on the silhouette in the upper-right corner, then the blue box [Add Account] & select [Create New Account] - Choose to have a seed/mnemonic phrase of 24 words, then take intendance to relieve them.
The safest fashion is to write the words on newspaper and store them in a secure identify. Avoid taking screenshots of the words or copying them into your computer/phone notes. - Now enter a proper noun for your business relationship (yous tin alter information technology afterward).
- Y'all can change the derivation path by clicking on [Advanced], but this is optional and non suggested for how we are going to utilize Keplr.
If you lot are interested in knowing more about the Hard disk drive wallet derivation path, you can find more in the Keplr FAQ , department [General Questions]. - One time y'all are sure that you lot accept correctly transcribed the seed/mnemonic phrase, click on [Adjacent].
- To confirm the creation of the new account, all yous have to exercise is click on the words in the correct lodge in which they announced in your seed/mnemonic phrase and printing [Register].
- If you have merely downloaded Keplr extension, it's time to prepare your password! Choose carefully, if possible prefer a password you're not using in any other application, and so click [Confirm].
If you have used Keplr earlier, this stride volition be skipped as you have already gear up your countersign when creating/importing your first account
👤 How to create a new Business relationship via One-Click Login
Note: The suggested path is to create an account via Mnemonic phrase or delegate via Ledger, I'thousand illustrating this procedure just because is the starting time time it is applied to Cosmos wallets and people might be not familiar with it.
- Choose the option [Sign in with Google]
- Now enter the email|phone number associated with your Google account, its countersign, and so click [Side by side].
In example you don't have an account yet, you can create 1 by pressing the [create account] button. - Time to ready your Keplr Wallet password! Cull advisedly, if possible one countersign yous're non using in any other application, and then click [Confirm]

• $BTSG (BitSong)
• $LIKE (LikeCoin)
• $NGM (east-Coin)
• $ORAI (Oraichain)
The tokens listed above are not natively supported in Keplr but tin can be added manually or linked to your extension.
💱 due east-Money
- Go to wallet.eastward-money.com
- [Chain Add Asking] window volition show off.
Here you have to choose [Corroborate] - At present you have to authorize the connexion between Keplr and e-Money:
In the [Requesting Connection] window, select [Approve] to keep. - Bank check now your Wallet by clicking on the [K] extension icon:
Amid the networks you can select, you lot may discover that in the [Beta Support] section [e-Coin Wallet] is now available. - You will now be able to visualize your mainnet address & manage your $NGM via the defended Dashboard.
🎶 BitSong
- Go to play.bitsong.io and click [Connect Wallet] on the superlative-right.
- Scroll all down and select [Import Your Wallet] and click on the Keplr logo.
- [Chain Add Request] window will show off.
Here you lot have to choose [Approve] - At present y'all have to authorize the connection between Keplr and BitSong:
In the [Requesting Connexion] window, select [Approve] to continue. - Cheque at present your Wallet by clicking on the [K] extension icon:
Among the networks you tin select, you may notice that in the [Beta Support] section [BitSong] is now bachelor. - You volition now be able to visualize your mainnet address & manage your $BTSG via the dedicated Dashboard.
👏🏻 LikeCoin
- Go to like.co/in and click [Sign in with your Wallet] on the top-correct of the popular-up window.
- In the [Sign in with your wallet] window, click on [Accept]
- Now cull the option [Sign in with Keplr]
- [Chain Add Request] window will evidence off.
Here you have to choose [Approve] - Now you have to authorize the connection between Keplr and Likecoin:
In the [Requesting Connection] window, select [Approve] to continue. - You volition now accept to confirm your access through an on-chain transaction: select [depression] fee to execute the functioning without using whatsoever $Similar
- You will now see the [Welcome] screen, where you will be prompted to create a Liker ID and enter your email. You can optionally upload a photo as your avatar.
- Bank check your electronic mail to confirm the address y'all provided and complete your registration!
- Check now your Wallet by clicking on the [K] extension icon:
Among the networks yous can select, you may notice that in the [Beta Support] section [LikeCoin Concatenation] is at present available.
💫 Oraichain
Span:
- Become to span.orai.io and click on the Keplr logo.
- [Concatenation Add Request] window volition show off.
Here you have to choose [Approve] - Now y'all have to authorize the connectedness between Keplr and BitSong:
In the [Requesting Connection] window, select [Approve] to keep. - Check now your Wallet by clicking on the [K] extension icon:
Amidst the networks yous can select, you may notice that in the [Beta Support] section [Oraichain] is at present available. - You lot volition now be able to visualize your mainnet accost & manage your $ORAI via the dedicated Dashboard.
Mainnet
- Go to airight.io and click on [Connect Wallet].
- Select [Connect ORAI/Keplr wallet], then [Connect Keplr Wallet]
- [Chain Add Request] window will show off.
Here y'all accept to choose [Approve] - Now yous have to qualify the connexion between Keplr and Oraichain sending a transaction:
In the window, select [Approve] to continue. - You will at present be able to visualize your mainnet address & manage your $ORAI via the defended Dashboard.
💡 Experiencing disruptions? Check the FAQ
📥 How to deposit your Tokens
- Click on the Keplr Icon on the top-right side of your window to open it.
- Select [Deposit] and the wallet will testify you your address and the associated QR lawmaking.
Once yous've sent your ATOMs to your Keplr wallet, yous will visualize the bachelor residual.

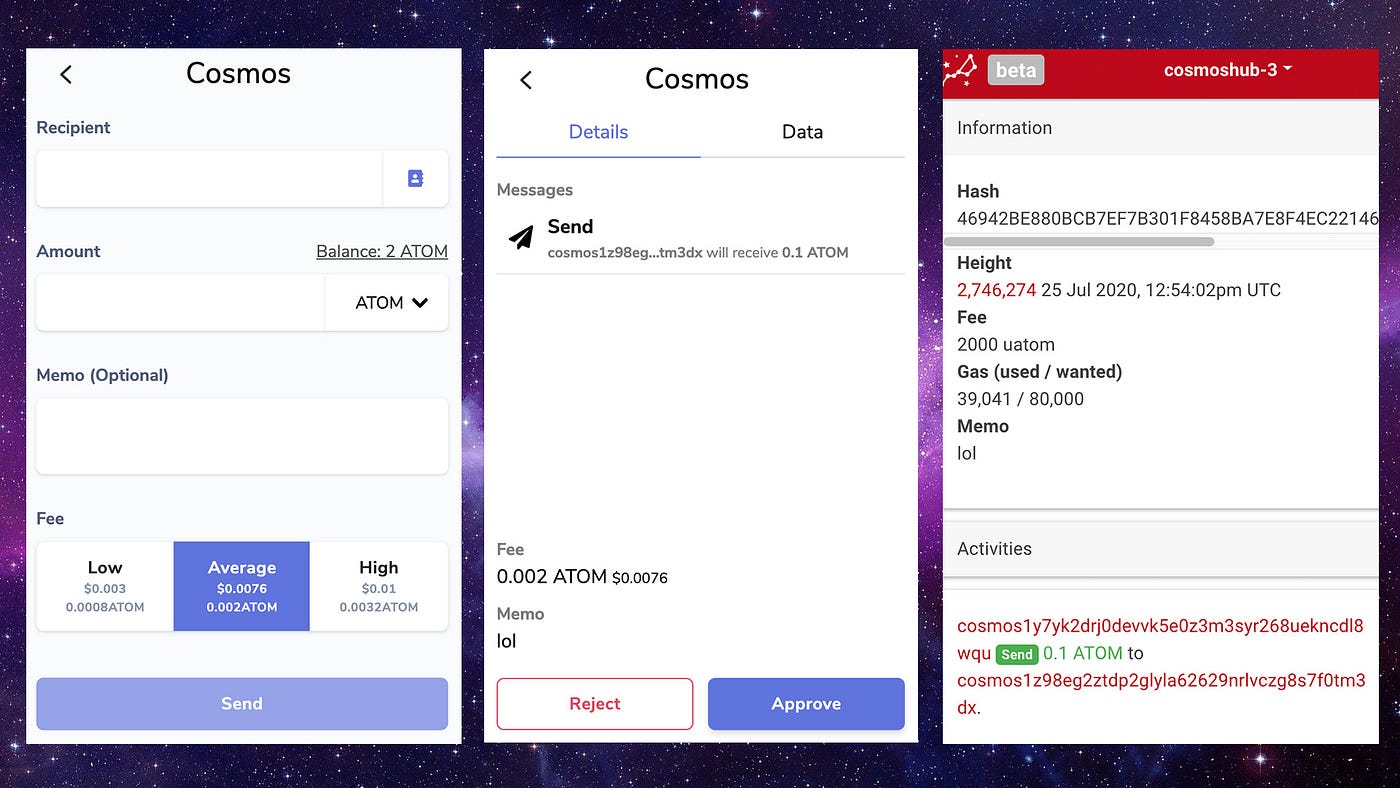
📤 How to send your Tokens
- Now let'southward try the [Send] selection.
Once yous have selected the right button, yous will visualize multiple fields:
• Recipient: the address you lot desire to transport your ATOMs.
ENS (ethereum name service) volition be soon integrated every bit well.
To notice the possibility to save a cosmos address in a very piece of cake-to-use agenda, as you lot can see in the pictures below.
• Amount: the number of ATOMs you lot want to send with this transaction
• Balance: this displays the funds at your disposition
• Memo (Optional): as y'all know, transaction to/from exchanges almost of the time requires a specific memo. Please check carefully if this is your case. If not, you can go out it white.
• Fee: you can choose between [Low], [Average] and [High].
Only a few validators admit depression fee transactions, so that might translate to a longer waiting fourth dimension to take the process done. - When all fields are accurately entered, information technology'due south fourth dimension to select [Send].
- A summary screen will now appear.
If all the information are correct, click [Corroborate] to consummate the performance. - You tin can easily check the status of your transaction via explorer.
The transaction was successfully sent, Yay!

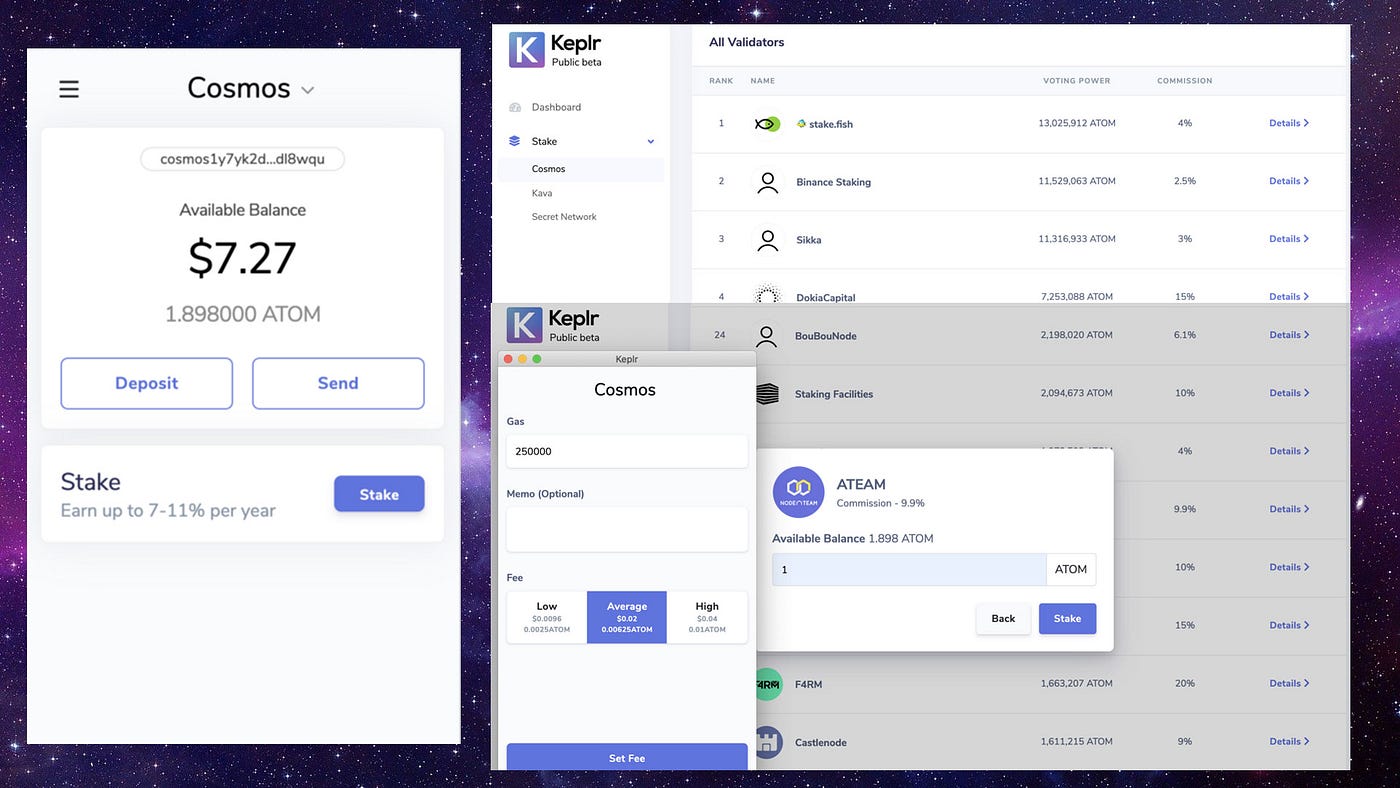
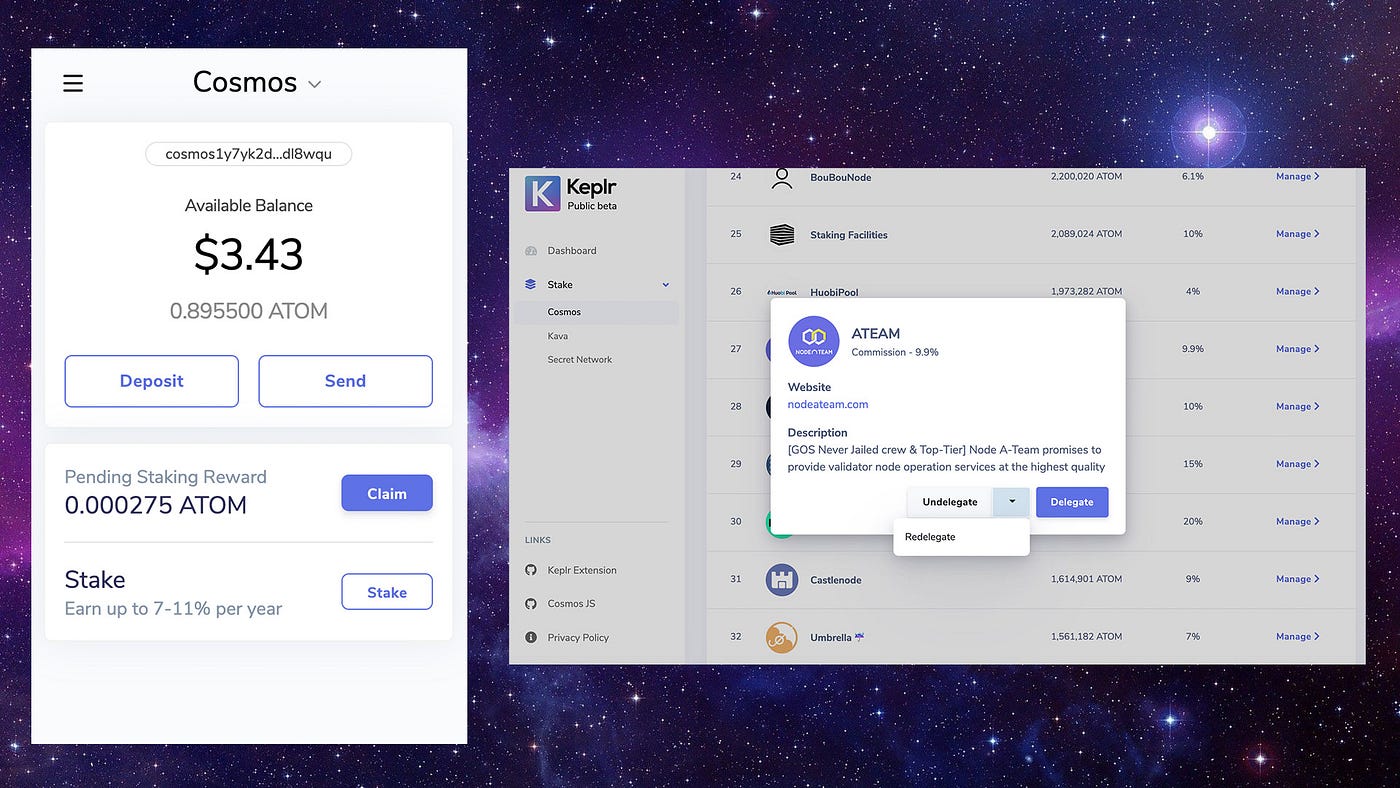
🔒 How to stake your [Natively Supported] Tokens
- Select [Stake] on Keplr, yous will exist redirected to the web version of the wallet.
- All validators belonging to the active set will be displayed here. You can see the details of each of them, the ATOMs already at pale, and the expected commissions.
To assist Creation on its path towards decentralization it is recommended to delegate to validators who are outside the beginning 10 positions. - Once you accept chosen your validator, select [Stake].
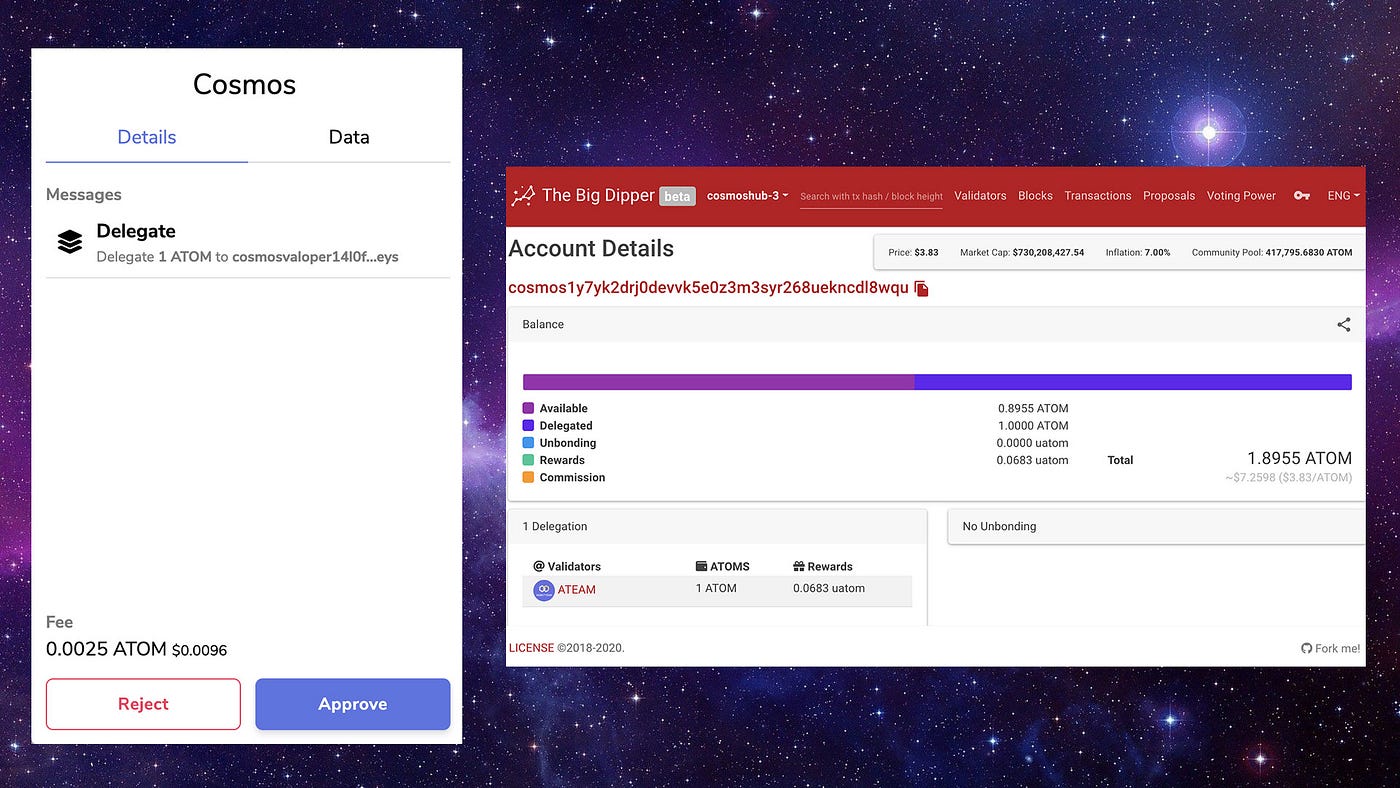
In this new window, you will be asked to select the number of ATOMs you want to delegate to that validator. Once you accept entered this field, press [Stake] again to keep. - The next screen is nearly the choice of the desired committee for the payment of the transaction on-chain. It is the aforementioned every bit before.
- Recap: If the details displayed match your requests, click [Approve] to complete the performance.
- Operation Successful!
Good Job Cosmonaut,
Cosmos is a safer place thanks to your delegation!
🔓 Claim your Rewards & Redelegate
Don't forget to [Claim] your rewards from time to time and to utilise the new [Undelegate] & [Redelegate] features to manage your $Atom with the maximum flexibility!
1. Click on [Claim] to reclaim all your pending staking rewards.
2. Click on [Re-Delegate] to change your validator. Yous can do this immediately the first time, then you lot must await 21 days earlier re-delegate again.
3. Choose [Undelegate] to remove your Atom from staking. During the *21 days of unbounding yous will not exist able to manage your tokens or gain staking rewards. Once you start the unbounding you tin't interrupt it.
*Unbounding flow might vary from chain to chain
Please note that to successfully complete the operations mentioned above, you must accept in your [Available Residual] enough ATOM to cover the transaction fee, and so pay attention to e'er keep a minimum of funds not staked (0.1 ATOM is enough).
Go along in mind that if y'all re-consul to some other validator, delegate more ATOM to the same validator or start the unbounding, all your pending rewards will exist automatically claimed & added to your available balance.
🌱 Exercise you lot want to export your Seed Phrase?
- In the extension click on the silhouette in the upper-correct corner.
- Click on the three dots and in the drop-down card select [View Mnemonic Seed].
- Confirm the operation by writing your Countersign.
- Copy the Mnemonic Seed Phrase and store it in a safe identify.
Remember that taking a screenshot likewise every bit storing the words in an unsecured, cyberspace-continued device is extremely dangerous.

🧸 Do you want to add or Create a New Account to Keplr?
- In the extension click on the silhouette in the upper-correct corner.
- Click in the bluish box [Add Account]
- Select the preferred option betwixt [Create New Account] [Import Existing Account] and [Import Ledger].
📇 Experiencing disruptions? Cheque the FAQ!
Getting Started with Osmosis
Swap, Provide & Mine Liquidity: offset experimenting now with the record-breaker Cosmos' AMM

Welcome to Osmosis, the AMM Laboratory!
Today we're going to delve into Osmosis DEX to observe out how to easily manage:
- Deposit
- Swap
- Provide Liquidity
- Liquidity Mining
If you need assistance, recollect to always use the official chats that you tin can find in the [Earlier Getting Started] section.
And now, rubber goggles on and let'due south get the experiment started!
Before Getting Started
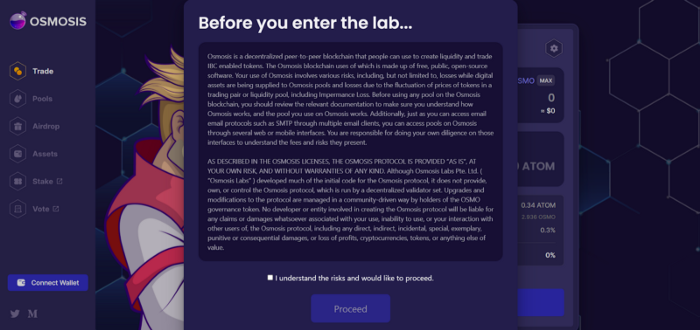
⚠️ Keplr is the only wallet integrated with Osmosis DEX & Keplr extension is officially supported only on Chrome.
To know how to create your account and make the first steps with Keplr Wallet, please check this Step-by-Step tutorial of mine .
It isn't possible to use Keplr extension or osmosis DEX from mobile.
⚠️ Pay attending to the websites you connect your Keplr wallet with.
This is the link to the Osmosis DEX Dashboard, be always extra careful when using search engines to notice a website.
⚠️ No one from Osmosis or Keplr teams volition ever write you in a DM asking to validate your wallet or type your mnemonics:
Delight beware of scammers and if you need help ever utilize public channels.
• Osmosis
• Keplr Wallet
⚠️ It is recommended to avoid executing operations at the end/beginning of each epoch (every solar day at 5pm UTC), as heavy traffic may result in congestion and subsequent transaction failure.
⚠️ Osmosis DEX Dashboard does non have an integrated explorer: to monitor your transactions you have to use tertiary-party explorers like Mintscan or Aneka.
⚠️ What about if I don't have $OSMO?
You can swap using [depression] fees for 0 $OSMO. Remember to adjust the gas [set gas] to at least 5000000.
⚠️ At this moment on Osmosis you might experience episodes of high volatility: please merchandise conscientiously.
You lot are your own banking company: help u.s. in assisting you lot in keeping it safe.
Deposit

Before performing any performance in the Osmosis DEX you must deposit the tokens you want to handle in the Osmosis dashboard.
Please proceed in listen that you will not be able to stake or transport via local chain your tokens until yous have withdrawn them.
Let's accept equally an example $REGEN.
Annotation: When depositing, always leave a minimum of tokens bachelor in your Keplr wallet so that y'all tin safely pay the fees.
- Become to this link, and click on [Connect Wallet]on the left side of the screen.
- Select [Approve]to successfully connect your Keplr Wallet Osmosis Account to app.osmosis.zone
- Click on [Assets] in the side-left bar.
- Scroll down to find [Regen Network — REGEN]
- Click on [Eolith]
- Keplr volition request you lot the authorization to connect app.osmosis.zone to your regen-ane business relationship. Select [Approve]
- Write downwardly in the [Amount to Deposit] field the amount of $REGEN you want to add to your Osmosis DEX Dashboard.
- Select [Deposit]
- A Keplr window will open and you will exist asked to ostend the transaction details by clicking the [Approve] button. You will also accept to select the fees you want to use: proceed in mind that y'all tin't select [Depression] (0 fee transaction), the minimum to see the operation successful is [Average].
It is not required to fill in the [Memo] field this time.
👩🏻🔬👨🏽🔬 Congratulations, by depositing $REGEN in Osmosis DEX yous can now start having fun with George Wosmongton's lab!
Please note:
• Depositing a token on Osmosis DEX is in fact an interchain transaction, which is why the time required to consummate the transaction could be up to x minutes.
• In the eventuality that the transaction is not successful after waiting for an hour, check the starting address. Usually, funds are automatically redirected to the originating chain. If this is not the case, please ask for support in the Osmosis conversation.
• To withdraw tokens, run the same process merely select [Witdrawal].
Swap [x] Token for [X] Token

- Click on [Trade], on the left side of the screen.
- In the swap box, select in the [From] field the token you want to give and in the [To] field the token you lot want to receive.
In our specific case, we volition select [$ATOM] in the first field and [$REGEN] in the second. - Write the amount of [$Cantlet] you want to exchange: automatically the counter value in $REGEN will be shown in the box below.
Annotation:
• Since the market is extremely volatile, the displayed value may modify by the time you ostend your trade. If yous want to brand sure that the expectation of the tokens you are nigh to receive does non differ as well much from reality, you can change the [Slippage] past pressing the little bike on the top right of the box.
There you lot accept 4 options: [1%] [2.5%] [3%] [5%] which represent the percentage of tolerance you are willing to accept in completing the operation. If the arrangement determines that information technology is impossible to execute the operation because the value of the tokens has changed, the performance will exist canceled.
• Don't swap all the tokens you have, at that place are fees to pay for doing so and if yous don't have this into account, your operation volition fail. - Select [Swap]
- A pop-upward window of Keplr Extension volition open up asking you to confirm your activity. Since the functioning is performed in the Omosis hub, the fees are requested in $OSMO. In case you haven't received any $OSMO from the airdrop you tin can choose the [Low] option, which will allow you to run the operation for 0 $OSMO.
Notation: Recently in that location take been some bug with transaction gas. To make certain your transaction is successful, please select [Ready Gas] and and then manually enter 5000000. - Click on [Corroborate]to complete the swap.
⚗️ Experiment completed successfully!
Provide Liquidity
In order to provide liquidity, you will need to take both sides of the pair.
If you want to provide liquidity in the REGEN:ATOM pool you lot will demand to have some $ATOM and some $REGEN, to provide liquidity in the REGEN:OSMO pool you will need both $OSMO and $REGEN, and and so on.
Not all the pools are 50:50 so in club to figure out how much of each you will need you can look at the puddle'southward details.
Remember that when we talk about pct we are referring to the value and not the number of the tokens.
Every bit we did above, we'll have every bit an example the REGEN:ATOM pool .
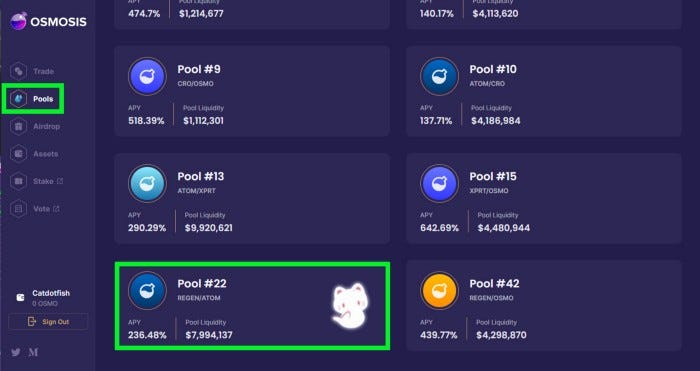
- Click on [Pools], on the left side of the screen.
- Incentivized Pools volition be displayed first. As a issue of proposed governance #half dozen, the REGEN:ATOM (#22) and REGEN:OSMO (#45) pools are both incentivized and so y'all volition notice them among the first.
Select [REGEN:ATOM] Pool. - Next, permit'due south have a look at the weight of this pool. Equally you lot tin can run into information technology says l% ATOM and 50% REGEN. This means that you will demand to provide an equal share of each token when providing liquidity. Once you lot have the required corporeality of tokens (1:1 ratio based on the value at that time of each) you volition be able to click the [Add / Remove Liquidity] button well-nigh the elevation.
- Write in one of the two fields (REGEN/Cantlet) the number of tokens y'all want to put in the liquidity puddle. The other field will exist automatically filled by the system.
- Select [Add together Liquidity]
- A pop-up window of Keplr Extension will open up asking you to ostend your action. Since the operation is performed in the Omosis hub, the fees are requested in $OSMO. In instance you haven't received whatever $OSMO from the airdrop y'all can cull the [Low] selection, which will let you to run the functioning for 0 $OSMO.
Note: Recently at that place have been some issues with transaction gas. To brand sure your transaction is successful, please select [Set Gas] and so manually enter 5000000.
🧪 Y'all take successfully provided liquidity to a pool! YAY!
In return, you lot take obtained LP Tokens called [GAMM/22], which you can make up one's mind to bond for a sure menstruum of time to earn OSMO tokens and participate in Pool governance. Read more in the next section!
Annotation:
• If you want to claim the tokens you have placed in the pool, all you have to do is click [Add/Remove Liquidity] once again, select [Remove Liquidity], the percent of tokens you want to redeem (25%-50%-75%-100), press [Remove Liquidity] and confirm the performance via Keplr pop-up.
• Rewards from incentivized pools are distributed at the end of each epoch, i.eastward. every solar day at 5pm UTC.
• Liquidity provision is not without costs. LPs have on a risk known as impermanent loss.
Liquidity Mining
To get LP rewards, y'all have to "bond" your LP shares, similar to how you would pale tokens for proof of stake.
In this tutorial, we will simply execute the process of bonding LP Tokens.
If you are interested in going into detail about what is liquidity mining and the risks and benefits associated with information technology, I recommend you read this vivid article published past the team of Osmosis .
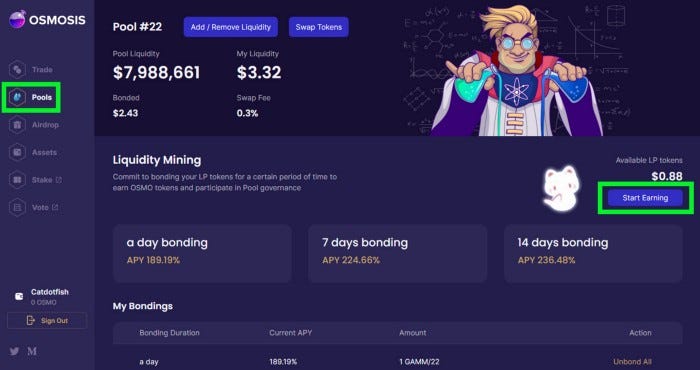
- Click on [Pools], on the left side of the screen.
- Your Pools volition exist displayed first. Select [REGEN:ATOM]
- In the Liquidity Mining department, select [Kickoff Earning].
- Yous tin at present choose how long y'all want to bind your LP Tokens for between the 1, 7, and 14 days options. Obviously the longer the fourth dimension, the greater the reward.
- Blazon the number of your available LP Tokens that you want to bond in the field provided, and press [Bond] to confirm.
- A popular-upwards window of Keplr Extension will open asking y'all to confirm your activity. Since the performance is performed in the Omosis hub, the fees are requested in $OSMO. In case you haven't received any $OSMO from the airdrop you tin cull the [Low] pick, which will permit yous to run the operation for 0 $OSMO.
Notation: Recently there have been some issues with transaction gas. To brand sure your transaction is successful, please select [Prepare Gas] and then manually enter 5000000.
🧿 Y'all are now an OsmoMaster!
Stay involved in governance to stay upward-to-engagement on new incentives and initiatives from the community!
Note:
• LP Mining bonding is very similar to how staking works in PoS:
. Yous have to explicitly send an 'unbond' transaction for your unbonding menstruum to begin.
. Unbonding period applies from when you lot choose to unbond, not from the fourth dimension when yous offset bail.
. You can't cancel an unbond.
But:
. Y'all tin can't unbond a partial amount of LP tokens. When you click [unbond all], you will be unbonding the full amount.
. Reward distribution happens at the end of an epoch (17:00 UTC), rather than on a per-block ground.
. You will receive partial rewards during the unbounding.
• If yous want to unbound the tokens, all you take to practise is click [Unbound All] in the [My Boundings] section and confirm the operation via Keplr pop-upward.
Getting Started with IBC Transfers
⚠️ Disclaimer ⚠️
IBC Transfers or Fungible Token Transfer ( ICS-20 ) are based on a standard ( ICS ) under active and rapid development .
I recommend that users approach this Keplr characteristic but after careful research and awareness of the risks associated with its improper use.
Please note that Chainapsis discourages users from sending mainnet tokens to zones other than the mainnet chains available here and does not take whatever liability related to the potential loss of funds due to the improper usage of the Interchain Transfers service.
I personally encourage users to play with IBC Transaction sending the equivalent of few cents each time:
If you are not an experienced user PLEASE USE [INTERCHAIN TRANSFERS] Just FOR TESTING PURPOSES!
⚠️ Attending ⚠️
• If you lot are swapping on Emeris/Osmosis before using Keplr [Interchain Transfer] y'all take to ship the obtained tokens back to their native concatenation via Emeris/Osmosis. Bank check the MINI-FAQ below and in case of doubts reach out to the support.
• Don't ship tokens via [Interchain Transfer] directly to a CEX: this can cause in most cases the loss of the funds
• Keplr automatically saves the channel selected the kickoff time, so it is essential to remember to alter it if this channel is no longer among the suggested ones. Your funds are not lost in this case! However, you may accept your tokens locked for hours earlier a developer unlocks them.
• Mintscan may not exist e'er updated and consequently, you may feel downtimes even with channels that are shown in green [available].
Mainnet Supported
🐇 Cosmos Hub | $Cantlet
🐇 IRIS Hub | $IRIS
🐇 Crypto.com |$CRO
🐇 Akash | $AKT
🐇 Osmosis | $OSMO & $ION
🐇 Persistence | $XPRT
🐇 Regen Network | $REGEN
🐇 Sentinel | $DVPN
🐇 Starname | $IOV
🐇 Sifchain | $ROWAN
🐇 Certik ($CTK)
🐇 IXO ($IXO)
Before Starting
This tutorial volition have Creation Hub and Osmosis as sample cases, but the process is applicable for all chains actively continued via IBC. Read more nigh how to find the right channel ID for your favorite chains in the Mini-FAQ available at the end of this Tutorial.
- Download (or update) Keplr Wallet Extension from the Chrome Shop.
Note: the Firefox extension is a note scam!
Download your Keplr Extension but from official links! - If this is your get-go time with Keplr, ready your extension creating a new account, linking your Ledger, or importing your account via mnemonic phrase (Hither yous tin can find the full tutorial).
- Check that you lot have enough $Cantlet/$OSMO in the [bachelor balance] in your Creation Hub & Osmosis accounts.
[Available rest] means liquid tokens: they cannot exist staked, unbonding, in the process of beingness disseminated as rewards, or in a LP (liquidity puddle). - Make sure to take set up your Cosmos/Osmosis mainnet addresses.
IBC Transfer Cosmos Hub <> Osmosis
- On your Keplr Extension, select [Cosmos] in the Network Option drop-downwardly.
- In the [IBC Transfer] department, click on [Transfer].
- Once you display the [Select Chain] field, click on [New IBC Transfer Aqueduct]
- Yous can at present add a new IBC Channel to your Keplr Extension:
on [Destination Chain] select [Osmosis] and write on [Destination Concatenation Channel ID] [channel-141]*. To finalize the operation, click on [Save].
*Keplr automatically saves the channel selected the showtime time, and so it's essential to call up to change it if this channel is no longer among the suggested ones on Mintscan.
✏ Notes:
• If you write the incorrect number on the [Destination Chain Channel ID], Keplr will decline the functioning with the warning [Failed to fetch the channel].
• To discover the correct aqueduct ID please follow the instructions available on the MINI-FAQ beneath, section [How can I find the correct aqueduct IDs for each concatenation to perform Interchain Transfers?]
• Call up that you must write the aqueduct ID in lower case (i.due east. channel-Ten)
- Once back in the [IBC Transaction] section of your sending address, enter your mainnet Osmosis address (osmosxxxxxxx…) in the [Recipient] field, a MEMO (Optional), and click on [Adjacent] to proceed.
- Now enter the number of Atom yous'd similar to send to Osmosis on the [Corporeality] field, select the preferred transaction fee then click [Submit].
I suggest using [Average] or [High] fees at this fourth dimension. - On the transaction confirmation page, you lot tin can review the details of your transaction. Click on [Approve] to confirm.
⚛️ Congratulations & Welcome to the IBC Gang! ⚛️
✏ Notes:
• IBC transactions may take more than time than the average internal transaction merely never exceed 5 min. If more than five minutes have passed and the tokens are not visible in the destination address, please refer to the MINI-FAQ below.
• Don't transport tokens via [Interchain Transfer] direct to a CEX: this tin can cause in most cases the loss of the funds.
• Don't send LP tokens to other Hubs.
• Don't utilise Keplr Interchain Transfers if y'all're swapping tokens via Emeris, delight use the Emeris UI.
IBC Transfer Osmosis <> Cosmos Hub
I will perform this process assuming that we have already performed the first transaction from Creation Hub to Osmosis.
Since Keplr automatically recognizes the channel ID needed to transport the tokens back, nosotros volition therefore non have to exercise the process of inbound the channel ID over again to perform Osmosis > Creation Hub Interchain Transfers.
If this is your first transaction from Osmosis to the Cosmos Hub, follow the tutorial equally described in the previous section, taking care to fill in the [New IBC Transfer Channel] department by selecting [Cosmos] and writing [channel-0].
✏ Note:
All IBC Hubs have their own channel ID and knowing this channel ID is necessary to perform the IBC transaction. In that location may also be backchannels opened by developers for testing purposes, but for the rubber of your funds, I strongly discourage sending Mainnet tokens to chains other than the ones listed in this tutorial as Mainnets & [light-green] channel IDs. See the MINI-FAQ below for more.
- On your Keplr Extension, select [Osmosis] in the Network Pick drop-down.
- In the [IBC Transfer] section, click on [Transfer].
Please use the [IBC Transfer] rather than clicking on the token itself (i.e. Atom/COSMOS Aqueduct-0) every bit clicking on the token volition only allow you lot to send the [IBC] Cantlet to another Osmosis accost via local chain transaction, rather than sending the tokens dorsum to the Cosmos Hub via Interchain Transfer. - Y'all tin detect now that by clicking in the [Destination Concatenation — Select Chain] field, [Cosmos] appears automatically.
- Enter your Cosmos Hub accost (cosmosxxxxxxx…) in the [Recipient] field, a MEMO (Optional), and click on [Next] to proceed.
- At present, enter the amount of $Cantlet you'd like to send dorsum to Cosmos Hub in the [Amount] field, select the preferred transaction Fee and click on [Submit].
You can select the entire amount of $ATOM bachelor past clicking on [Remainder] - On the transaction confirmation screen, you tin can view the details of your transaction. Select [Approve] to ostend the transaction.
The transaction will be completed at the moment the spinning circle volition disappear from the section [IBC Transfer] of your Keplr Extension.
💡 MINI-FAQ
- Can I perform Interchain transactions to addresses non linked to a Keplr wallet?
Aye, but the accost MUST be a not-custodial wallet account and the receiver will exist able to run into/manage the tokens only by importing his/her business relationship into Keplr. - Can I successfully perform Interchain Transfers to Exchanges?
NO, if you perform an IBC transfer with an Commutation address as the destination your funds will be lost.
Please ship first the tokens to their own mainnet then from in that location ship them via local concatenation transaction to the exchange. - Can I send Osmosis and Emeris/Gravity DEX LP tokens via [Interchain Transfer]?
No, and please don't attempt. - Are channel IDs the aforementioned for every chain?
No, every chain has its ain aqueduct (or fifty-fifty multiple channels per chain): please don't try to use unlike paths from the one available on Mintscan in the section [IBC Relayers]. - How tin I find the correct channel IDs for each chain to perform Interchain Transfers?
Go to the [IBC Relayers] section of the starting chain:
Cosmos Hub, IRISnet, Crypto.org, Akashnet, Osmosis, Persistence, Sentinel, Starname, Sifchain.
To find the right channel ID (which must be written in lower case channel-[number]) y'all only have to click on the chain to which you want to ship your tokens and look for the channel indicated in green: the number of the aqueduct ID will be the one on the left! For instance, the channel-id to ship from Cosmos Hub to Osmosis is channel-141, but the aqueduct-id to send from Osmosis to the Cosmos Hub is channel-0.
✏ Note:
• If at that place are no green channels please expect because there is a risk that the relays that connect your starting chain with that zone are temporarily inactive.
• Regen Network isn't available on Mintscan just you can check the open channels from the destination concatenation if needed - When other mainnet chains will be available to perform IBC Transfers?
Terra, Certik, IXO, Sommelier, and few others are almost ready: stay updated by post-obit or Cosmos social media platforms (Twitter, Telegram, Reddit) to not miss any news! - How many fees does information technology toll to make an IBC transfer?
Just a few cents! - How long does a transfer take to consummate?
It depends on the current status of the network and relayer, but should non exceed 1 minute.
If the funds still have not arrived after 5 minutes, please cheque the status of the transaction (failed, successful) on Mintscan by pasting in the search bar on the elevation of the website the mainnet address from which you sent the tokens. - How can I know if the transfer was successful?
You can bank check the status of the performance via block explorer that supports IBC Transfers, such as Mintscan:
• Re-create the mainnet address from which you make the ship (i.due east. cosmosxxxxxxxxxxxxxxxx) past clicking on information technology on Keplr Extension.
• Paste the mainnet address in the Mintscan search bar on the top of the website.
• Once Mintscan has loaded the folio related to your accost, ringlet down to the [Transactions] department and look for the specific transaction: side by side to information technology you will find the tag [IBC Transfer] in purple and [Success] in green or [Fail] in red depending on whether the transaction was successful or non. • If the transaction failed whorl down to read how to troubleshoot.
• If the transaction has the tag [Success], click on the transaction hash (series of numbers and letters in blue above the word [IBC Transfer]) and open the transaction tab.
• Scroll down to the [Receiver] field and click on the mainnet address there (which should stand for to the mainnet address yous wanted to send the tokens to).
• This will open the page for that specific mainnet address: coil down and check that the respective transaction has the tags [IBC Received] and [Success].
✏ Annotation:
In the destination address folio the transaction will be displayed with another transaction hash and if yous are sending tokens other than the native ones of the mainnet itself, Mintscan volition show 0 in the token details. If this is the case, you can read about the sent IBC tokens by clicking on the transaction hash, which will open the transaction details tab 'from the perspective' of the destination address. - What should I do if the transaction has failed?
Delight try over again after at least 5–ten minutes.
If the trouble persists, please endeavor to check what the bottleneck might exist by consulting the FAQ.
Close to the beginning of the Osmosis epoch at 5PM UTC you lot may feel congestion, if this is the case please expect a bit longer. - What should I do if the transaction was successful just the funds take non arrived?
• If you lot were using Emeris features such as [Swap]
If you swapped or did other operations on Emeris and and then sent the resulting tokens out from the Cosmos Hub via Keplr [Interchain Transfer], your tokens are probably displayed on Keplr Extension destination mainnet menú as [X Token](Ten CHAIN — Channel-X) format in the [Tokens] part.
To unlock them please perform an interchain transfer in reverse using the same channel: Keplr should have saved the channel you lot used previously, if this is not the example await for the channel ID as described in [How can I find the correct channel IDs for each chain to perform Interchain Transfers?].
Once your tokens are returned to the sending accost, use Emeris to perform the operation and send the tokens out of the hub.
✏ Note:
To perform the opposite operation to return the tokens to the sending address y'all must take mainnet tokens available at the destination address to pay the transaction fees. [Available balance] means liquid tokens located in their fashion: they cannot exist at stake, unbounding, as rewards, or used to LP.
• If you lot didn't use Emeris
If the transaction is shown as successful but the funds practice not go far at the destination chain within an hr of the execution, please ask the team for back up and refrain from performing whatever further operations on the aforementioned concatenation, as this is a sign of a possible relayer downwardly.
You can find how to effectively notify them in the section beneath. - What information do I need to provide to receive support?
The hash of the transaction you want to receive assistance with, including a cursory explanation of what you were trying to practice and what yous did right before.
It is particularly relevant to annotation whether you performed transactions via Emeris/Osmosis or whether you interacted with a centralized exchange. - Where can I find the transaction hash?
You lot can cheque the transaction hash via cake explorer that supports IBC Transfers, such as Mintscan:
• Re-create the mainnet address from which you make the send (i.e. cosmosxxxxxxxxxxxxxxxx) past clicking on information technology on Keplr Extension.
• Paste the mainnet address in the Mintscan search bar on the tiptop of the website.
• Once Mintscan has loaded the folio related to your address, ringlet downwards to the [Transactions] department and wait for the specific transaction.
• One time you have institute the transaction for which yous wish to receive assistance, please click on the series of numbers and letters in blue above the words [IBC Transfer] for that specific transaction: this will open a page with all the essential information to provide you with help, and so copy the link and provide it to the back up team.
How to vote for Governance Proposals with Keplr Wallet
Governance in the Hubs is becoming a more than and more than fundamental component in the whole evolutionary process of the project itself: through voting, it is possible to upgrade, fund a squad with tokens from the Community Pool to create unique tools, and much more than.
Needless to say, as much as voting is a right, it is also a duty.
Information technology is extremely important to think that delegators can overwrite the vote of their validator at any time if not satisfied with its choice (obviously this in relation to the voting power possessed by the delegator itself).
Be an active office of the success of a project,
Participate actively in Governance!
*In this tutorial we will use Cosmos Hub as an example, but the process is applicable for all integrated Bondage
🏛 Spring to the Governance Department
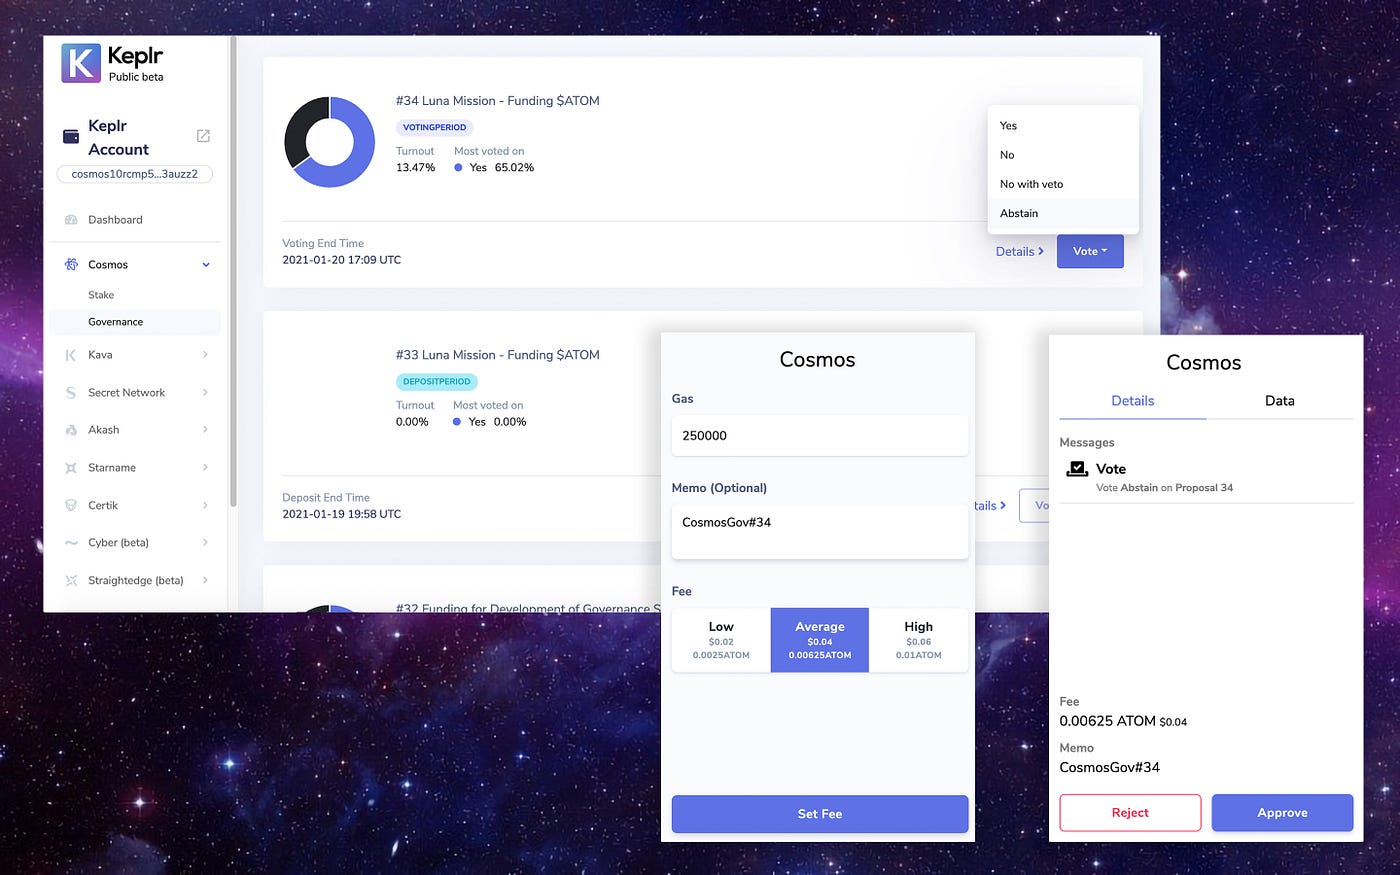
- Get-go, become to Keplr App: once on the Home Page, click on [DashBoard] in the upper right corner.
- Once you lot have spotted the section dedicated to Creation Hub in the navigation bar on the left, select [Governance] from the available options.
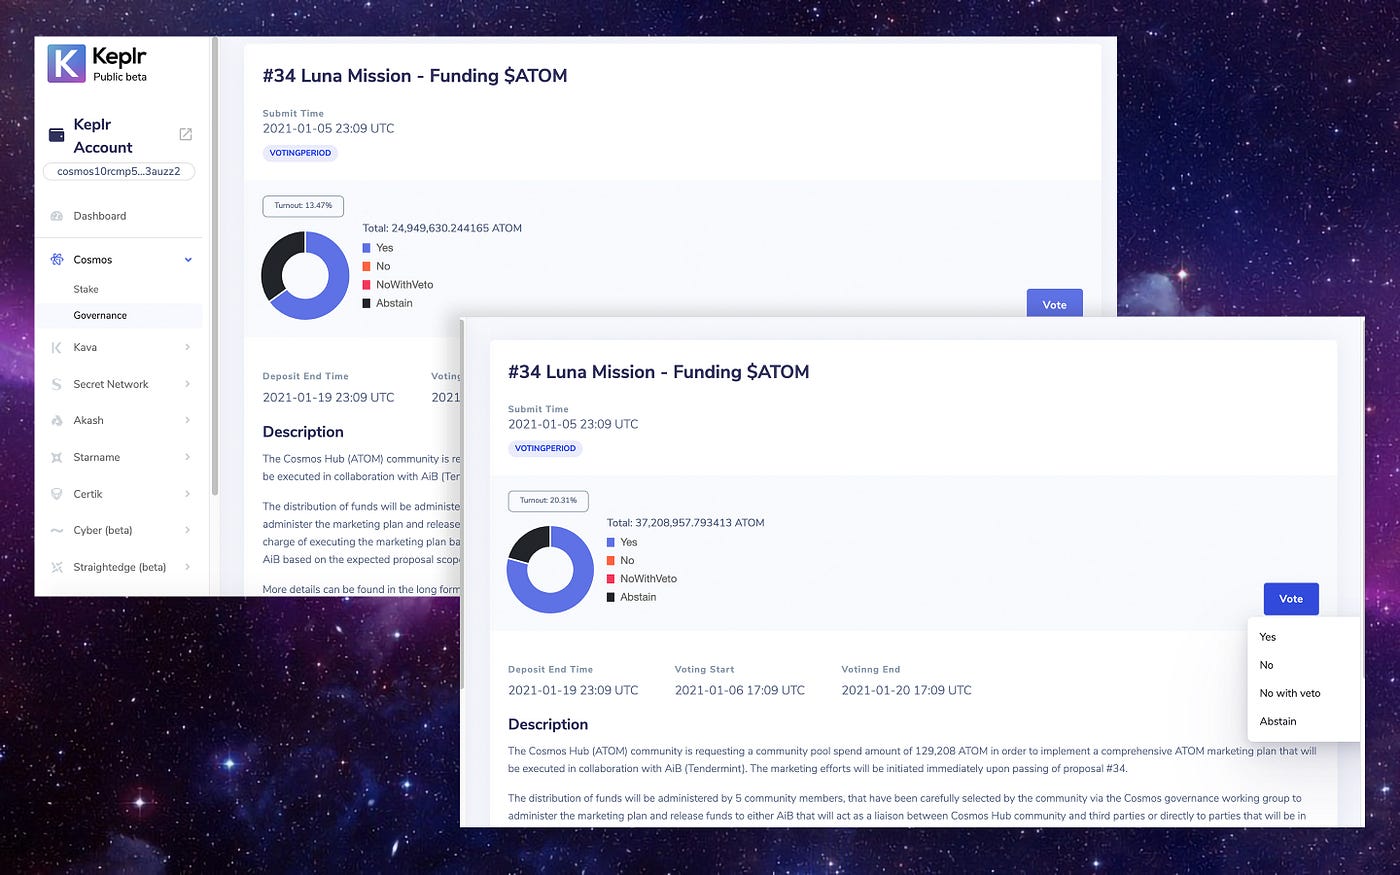
- On the governance folio, y'all will detect all the data virtually current and past on-concatenation proposals: in this tutorial, we will have as reference the Creation Governance Proposal #34 — Luna Mission.
Proposals for which yous tin vote are marked with the blue tag [Voting Menstruation]. - In case you haven't had time to check out the Cosmos forum or the Governance telegram chat, yous can read the total text of the proposal in gild to cast an informed vote past clicking on [Details].
Instead, if you lot are up to engagement on the topic, go to [🐇 How to Cast your Vote].

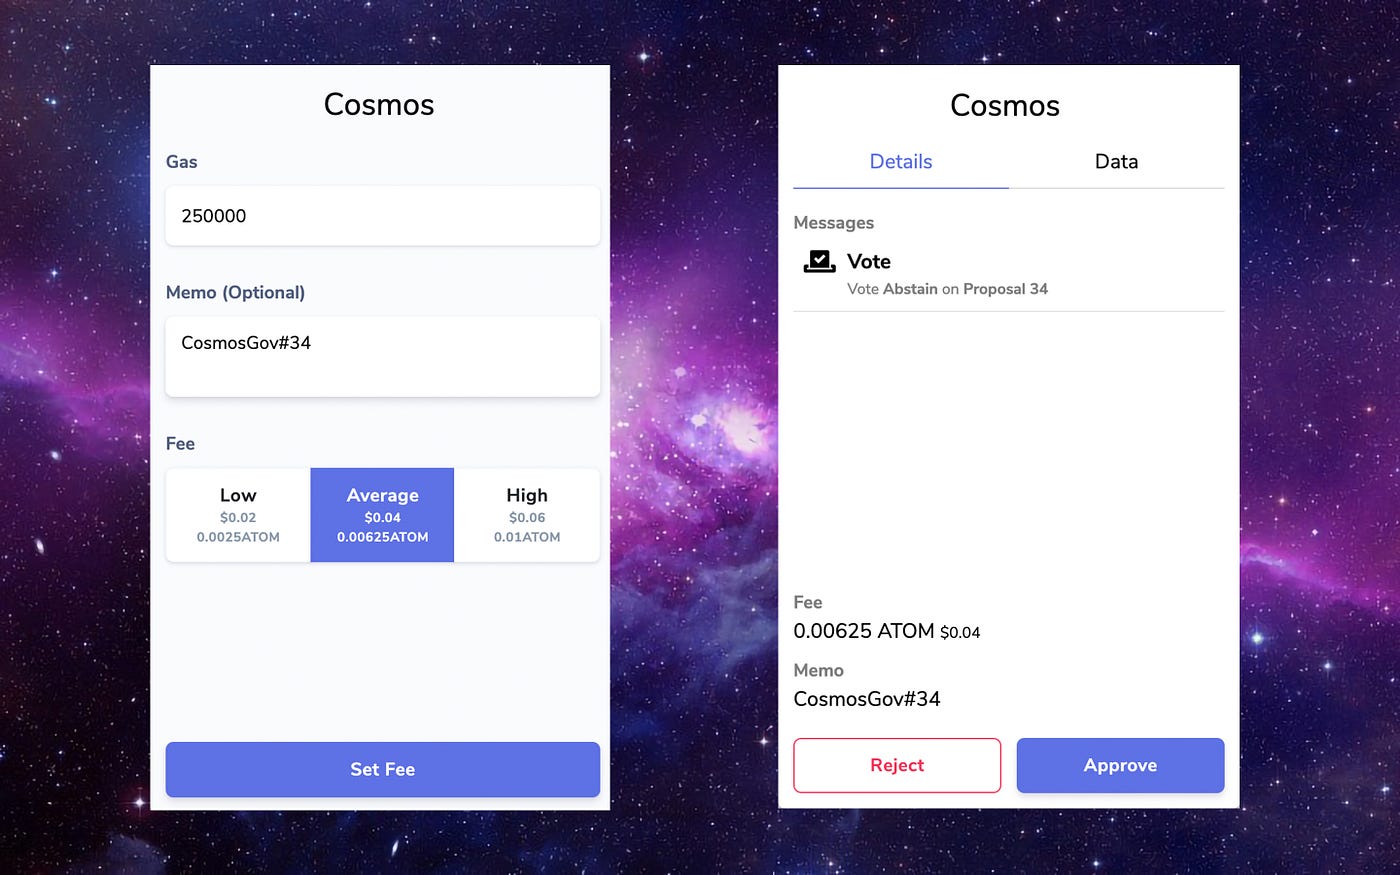
🐢 How to Cast your Vote
- After consulting all the data and links available on the page and getting a better idea of the full general position of the customs through the graph that you tin find at the top, it is now time to vote.
- Click on the blue [Vote] button at the top right of the screen.
- Now select in the driblet-downward carte what is your pick.
I volition select [Abstain]. - In the window that opened, select the Fee yous desire to pay between [Low] [Average] and [High].
If necessary, write down in the [Memo] field what this operation was for.
When you are satisfied, click [Set Fee]. - In the final summary, y'all will be able to verify that all data is right.
To finalize the operation click on [Approve].
🐇 How to Cast your Vote
- On the Governance master page, click on the [Vote] button available in the Governance Proposal #34 dedicated section.
- Now select in the drop-down menu what is your choice.
I will select [Abjure]. - In the window that opened, select the Fee you want to pay betwixt [Low] [Boilerplate] and [Loftier].
If necessary, write downwardly in the [Memo] field what this operation was for.
When you are satisfied, click [Set Fee]. - In the final summary, you will be able to verify that all information is right.
To finalize the functioning click on [Corroborate].
Enable & Mint $sSCRT with Keplr
SecretSCRT ($sSCRT) is a privacy-preserving, fungible Hugger-mugger Token that is backed by $SCRT, the native currency of Undercover Network.
$sSCRT is the start implementation of the SNIP-20 standard.
Read more than in the Blogpost or scroll downwards to the tutorial!
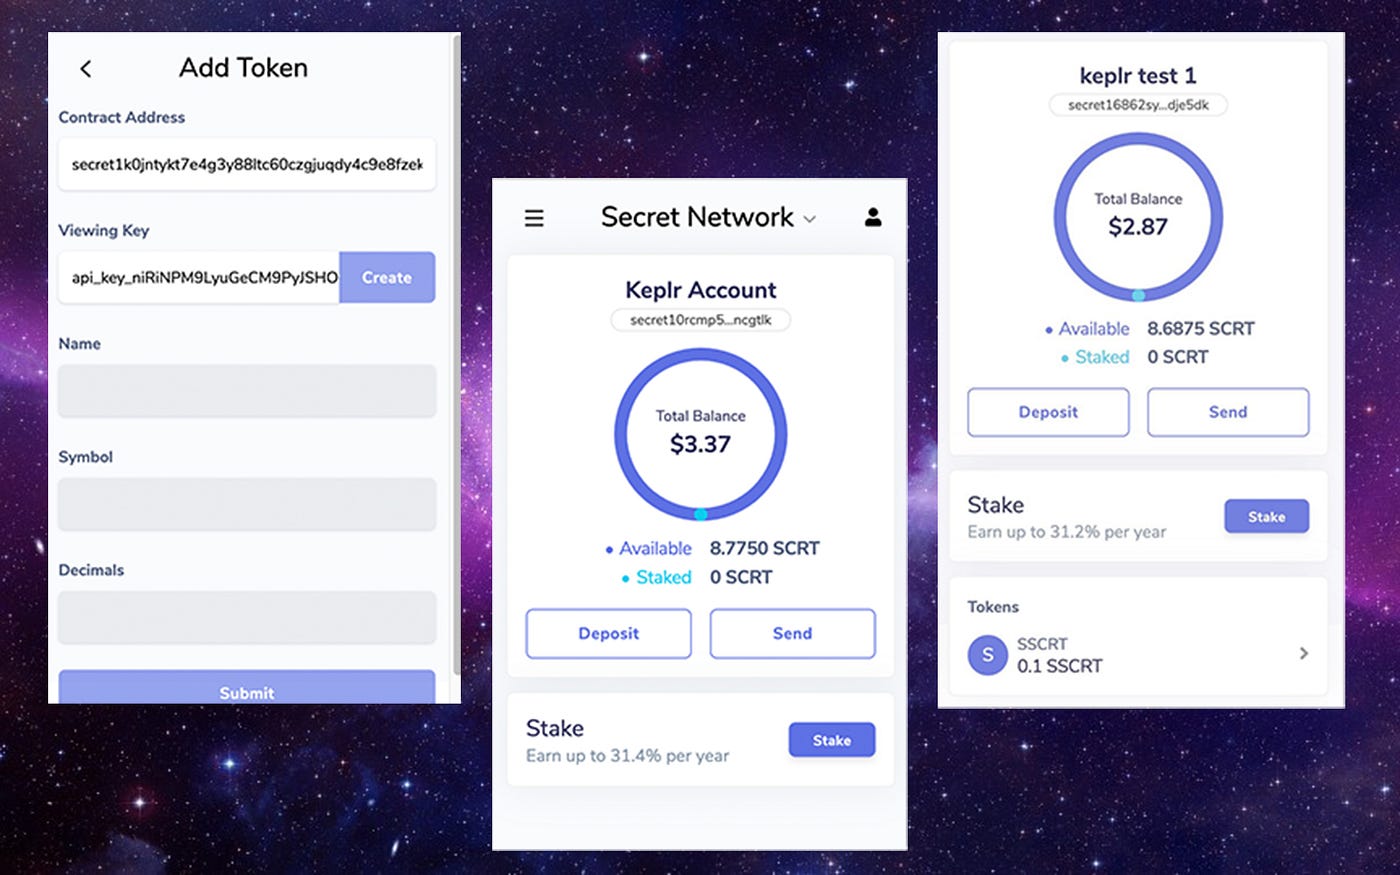
🔑 Create the Viewing Key
- Access your $SCRT account on Keplr Wallet Extension.
- Click on the three lines at the top left to brandish the carte du jour.
- Select [Add Token] from the menu pick.
- Paste the following contract into the section called [Contract Address]:
[secret1k0jntykt7e4g3y88ltc60czgjuqdy4c9e8fzek] - After a few moments of waiting you lot will run into the other fields fill in automatically, except [Viewing Key].
- Select [Create].
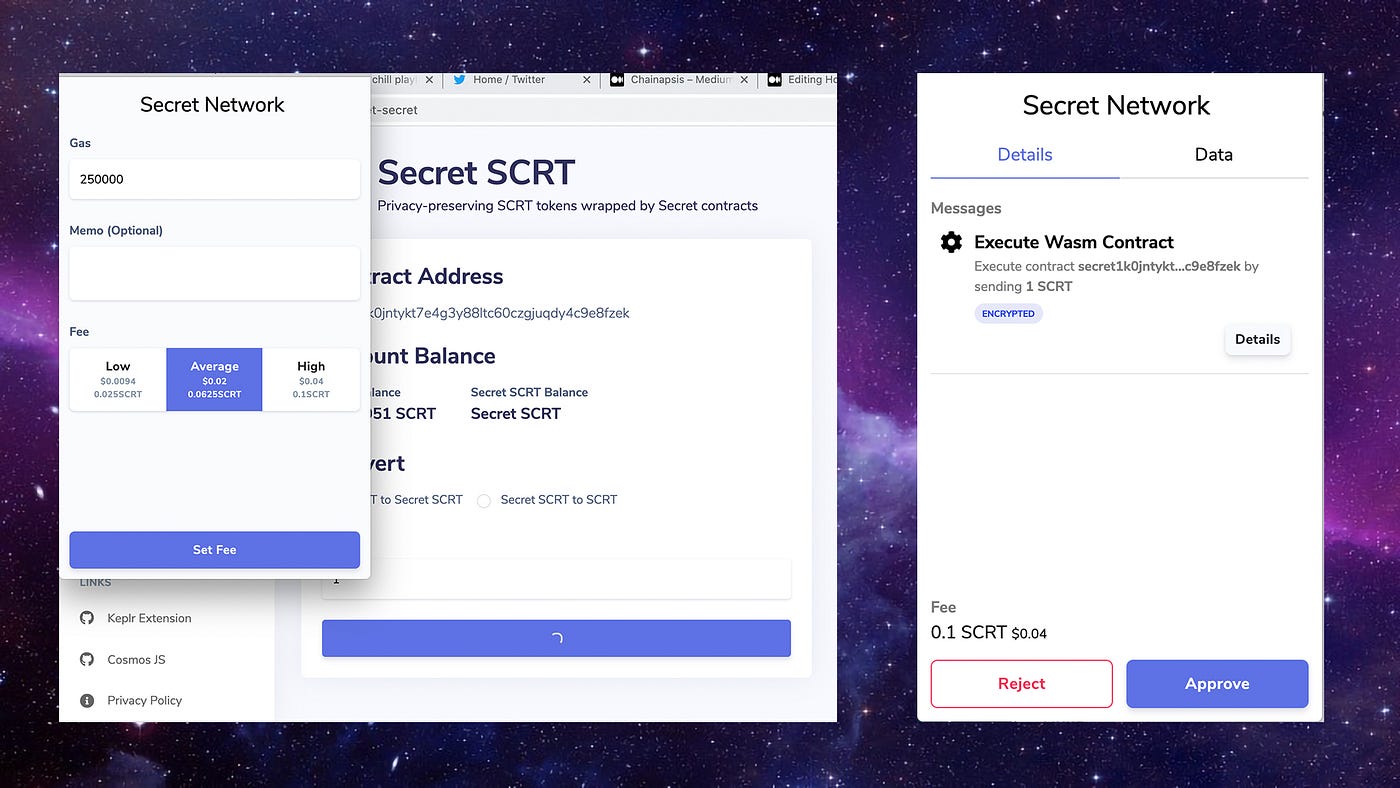
- Now you take to cull the fees. A small annotation: the transaction will not be successful if you lot choose a too low amount, then I recommend setting [High].
- Once [Set Fee] is selected you lot volition have the possibility to cheque the operation one terminal time before confirming it by clicking on [Corroborate].
- If the transaction was successful, you volition notice your available balance decreased as a result of the gas spent.
In case you meet ane of the two fault messages (shown in the moving picture n.3):
• In the first example, it is a system fault, which tin be resolved by closing and reopening Keplr or refreshing it.
• In the second one, the system warns us that the gas that had been selected was not enough to cover the cost of the operation.
In both cases, you lot cannot do otherwise than run once more the operation from the beginning.


🧿 Enabling $sSCRT on Keplr
- Once the performance is successfully completed, you will exist automatically redirected to [Add Token].
- Y'all will notice that the [Viewing Primal] field has now been filled automatically.
- Select [Submit] to complete the procedure.
Don't exist scared if you don't see any credible change in the abode page: as before long as $sSCRT are sent to y'all, an additional dedicated section will immediately appear, like the ane you can see in the image below.
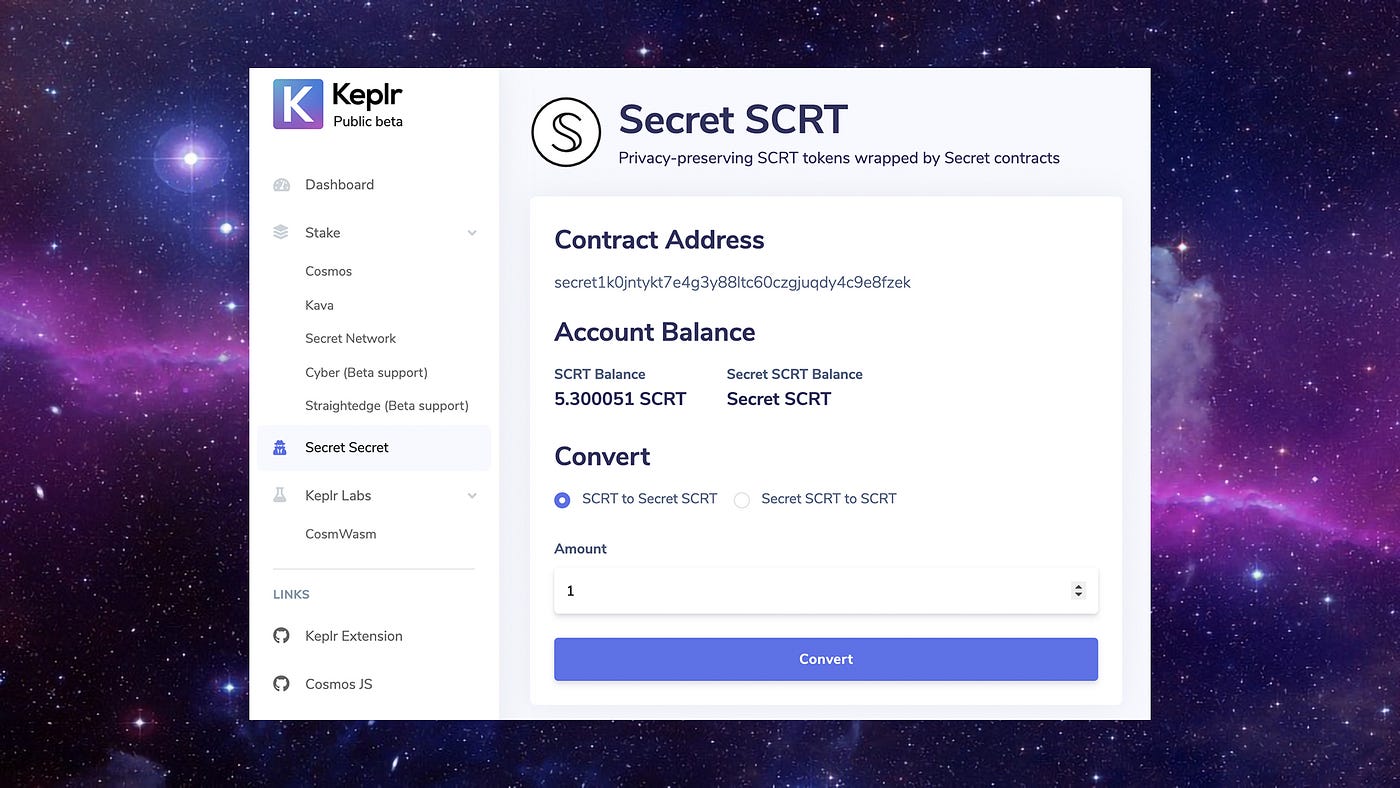
💎 Mint Secret SCRT tokens using Surreptitious contracts
- Go to Keplr Wallet Dashboard
- Click on [Hugger-mugger Surreptitious] on the menù selection.
- To create $SSCRT you have to check that in the [Convert] section the option selected is [SCRT to Secret SCRT]
- Enter in the [Amount] department the amount of $SCRT you want to convert to $sSCRT. On the same screen, on the top, you can encounter your available remainder: remember that the apply of the smart contract has a toll and so make sure you have plenty resources.
- Once determined the amount, click on the bluish [Convert] button on the bottom.
- In the window that appeared, select the gas y'all intend to use to complete the operation and ostend by clicking [Select Fee]. I remind you that information technology is strongly recommended to select [High] to take the best experience in terms of performance.
- Finally will appear the operation summary screen: later checking that everything is as you requested, click [Corroborate] to complete the procedure.
🕵🏻♀️🕵🏽♂️ SΞCRΞT AGΞNTS: Performance Complete!
Yous can at present view your $sSCRT balance either in the appropriate section of the app or directly on Keplr, by scrolling down to the Hush-hush Network panel.
🎁 Exercise you desire to send your $sSCRT to a Secret Agent?
On Keplr (extension) click on the $sSCRT box:
A window volition automatically open up and all you have to do is enter the recipient'due south accost (secretxxxxxxxx…) and the corporeality of $sSCRT to start sharing with more than and more people what is an case of the infinite potential of Secret Network!

Are yous curious to learn more about Secret Network?
Here are the articles for you:
- Introducing Secret Network
- Secret Network Governance Proposal #19, a Retrospective
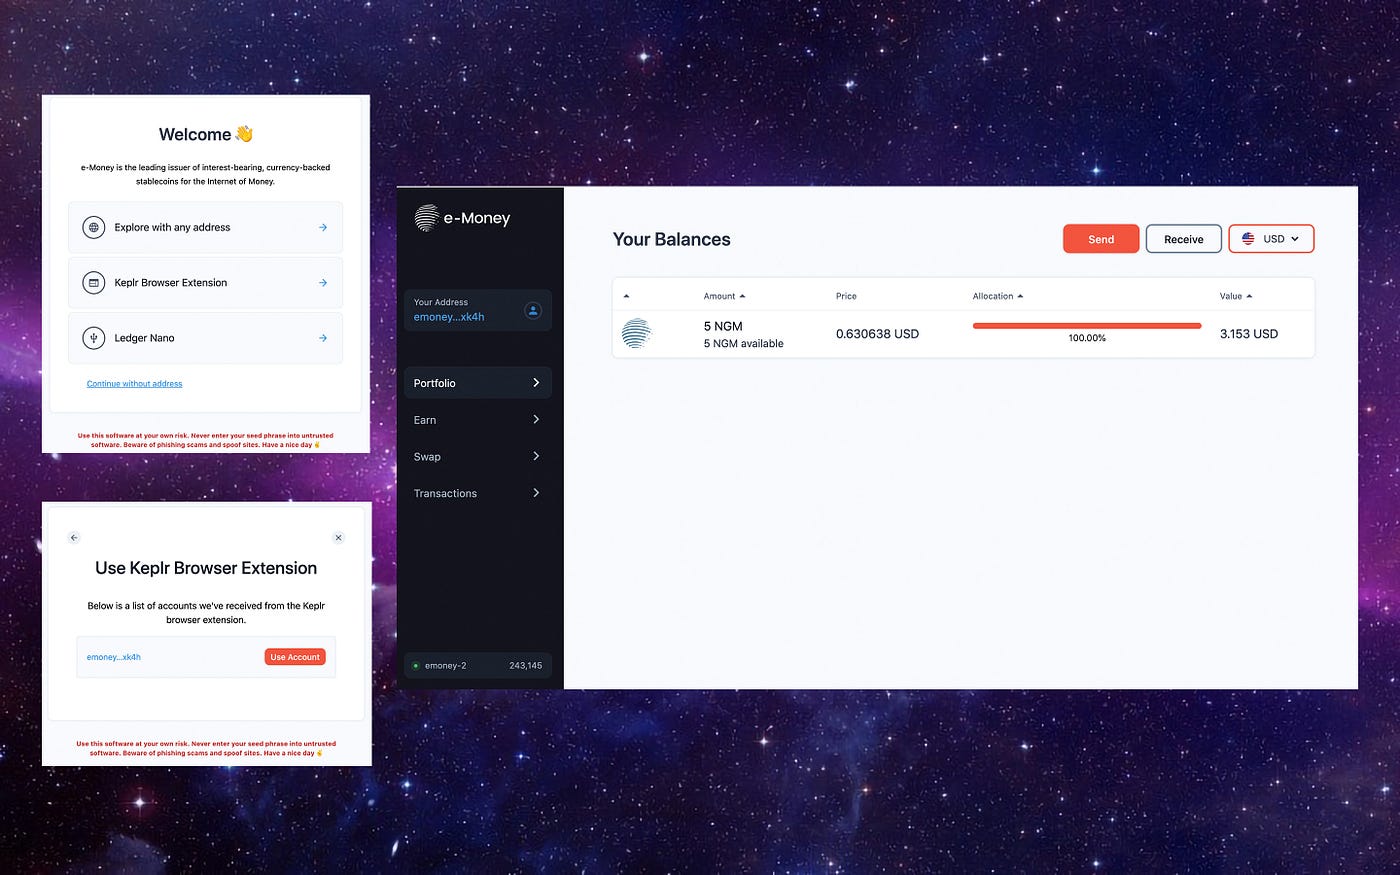
How to add together eastward-Coin back up to Keplr
e-Money is an electronic payment system and shop of value operating in the financial services industry.
The company vision is to create a level playing field, providing equal access to transparent financial services, on a global calibration, while profoundly reducing cost.
eastward-Coin is not designed to human action as a wholesale replacement for the existing financial system, only can instead be thought of as the layer 2 solution for traditional finance.
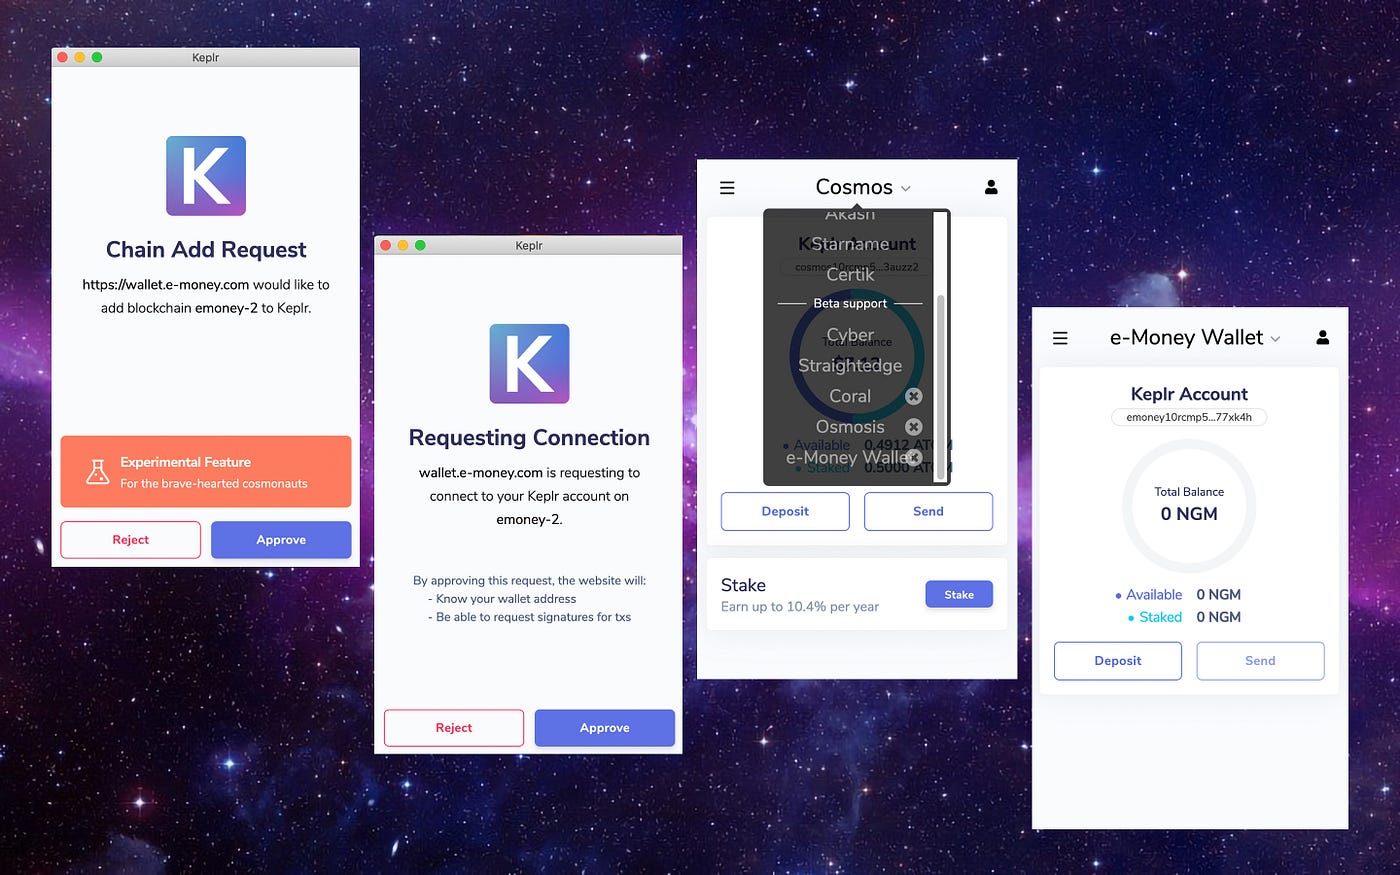
🔗 How to Link your Keplr Account to e-money Wallet Dashboard
- Become to wallet.east-coin.com
- [Concatenation Add Asking] window will show off.
Here you have to cull [Approve] - At present you have to authorize the connection between Kepler and east-money:
In the [Requesting Connexion] window, select [Approve] to continue. - Check at present your Wallet by clicking on the [Chiliad] extension icon:
Amid the networks you tin select, you may discover that in the [Beta Back up] section [e-Money Wallet] is now available. - Go to wallet.due east-money.com/welcome
- Select [Keplr Browser Extension] and and so [Apply Account]
💡You're all set!
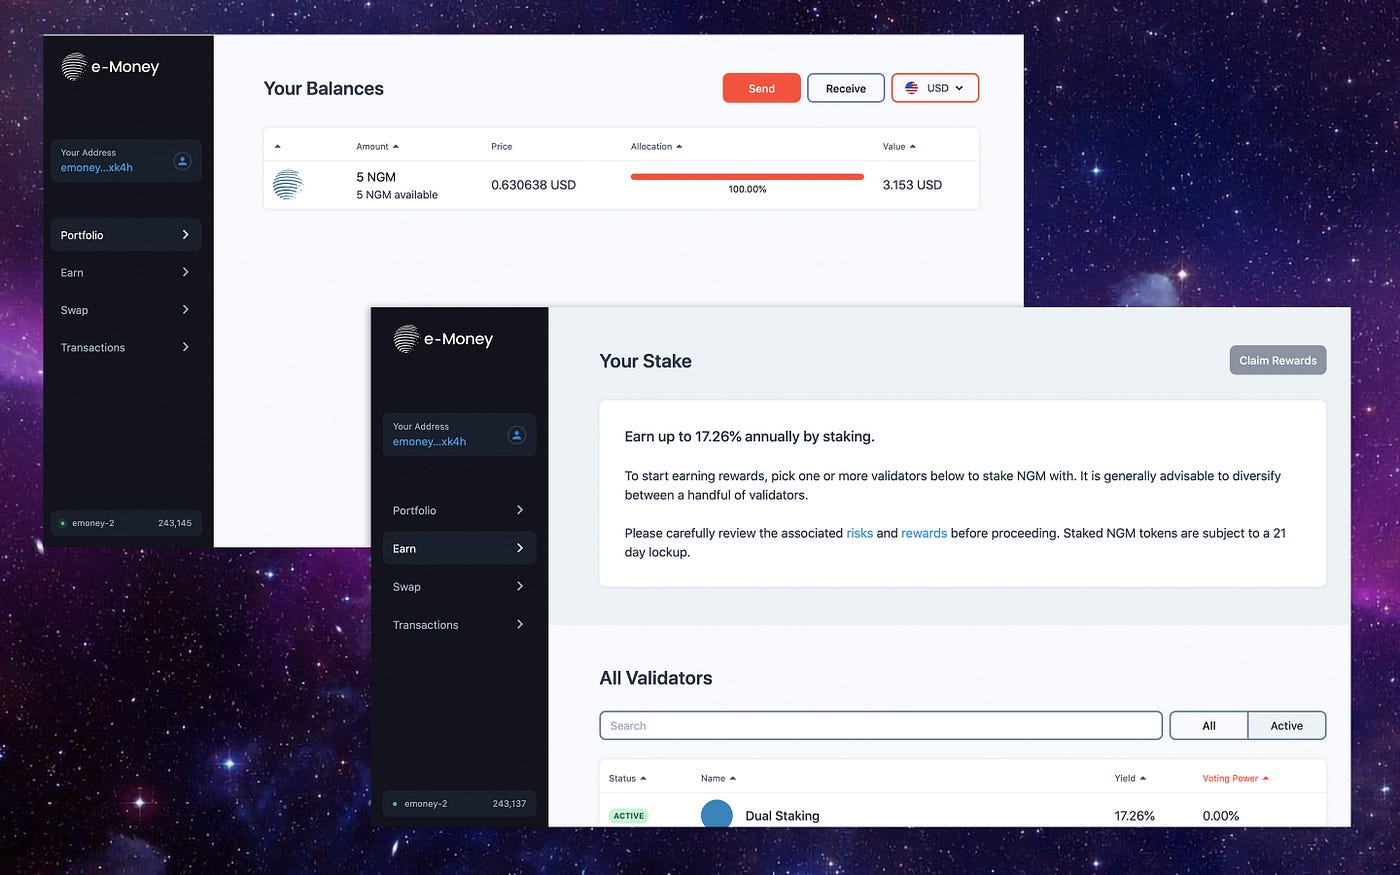
💰 How to First Staking with Keplr & due east-money Wallet
- In the Dashboard, select [Earn] from the side bill of fare.
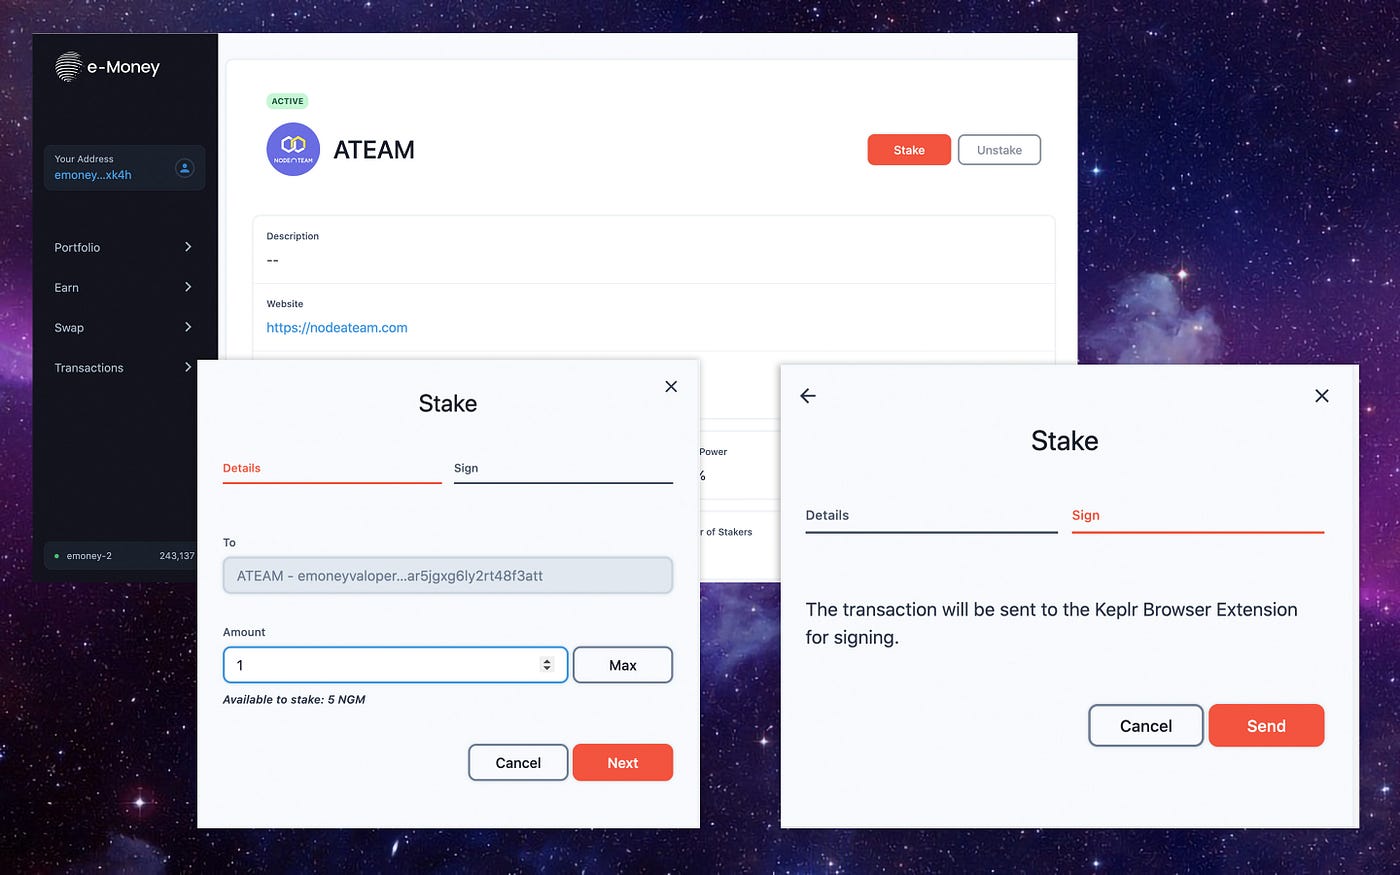
In this section, you lot can view all the validators that are part of the active set in the eastward-money chain. - Once you find the validator yous desire to delegate your $NGM to, click on its name: on its page click on the orangish [Stake] button at the top right of the screen.
- A window will popular-up asking you start to select the amount y'all wish to delegate to the validator, and then confirm your willingness to send the functioning to Keplr for the finalization of the functioning itself (Signature).
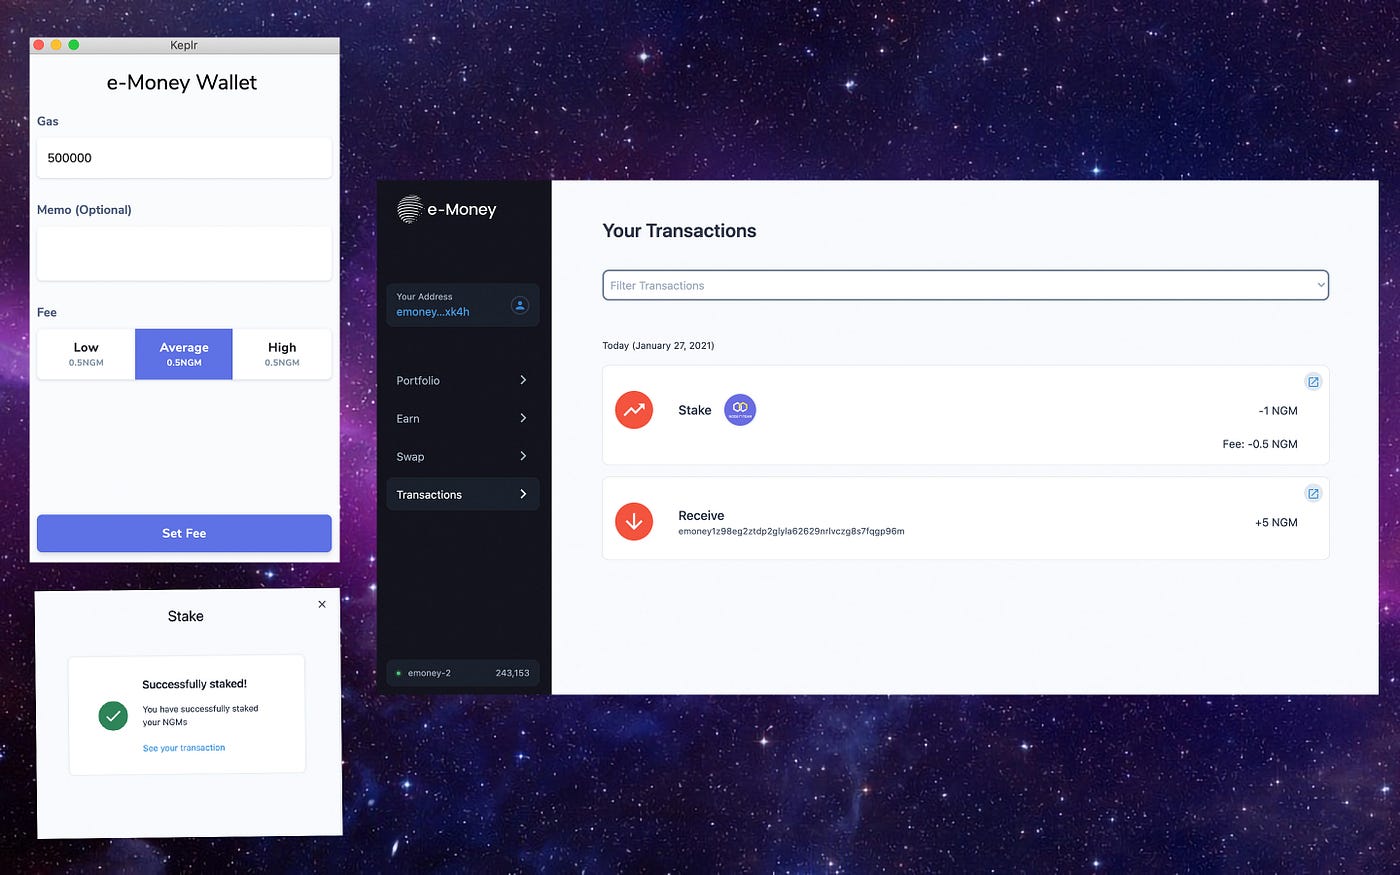
- A Keplr window will open, in which you lot'll have to select the desired fees and ostend the operation.
- In case of success, yous will run into the find [Successfully Staked].
Yous can bank check the details of the transaction at any time by selecting [Transactions] in the side menu.
♥️ Past staking you not only help keep the network safe but you also receive rewards!
Are you curious to learn more than about e-Money?
Here are the articles for you:
- An Introduction to e-Money
- What Makes east-Coin's Currency-backed Stablecoins Different?
How to reserve a *Starname with Keplr and link it to your personal crypto addresses
Starname is a NameService that makes information technology easy to send and receive cryptocurrency and access special websites past uncomplicated names rather than past long, complex strings of letters and numbers.
A Starname is your universal username for the blockchain earth and represents one of the last steps required to finally reach the much-awaited blockchain "mass adoption".
💻 Access to Starname'southward Dashboard with Keplr
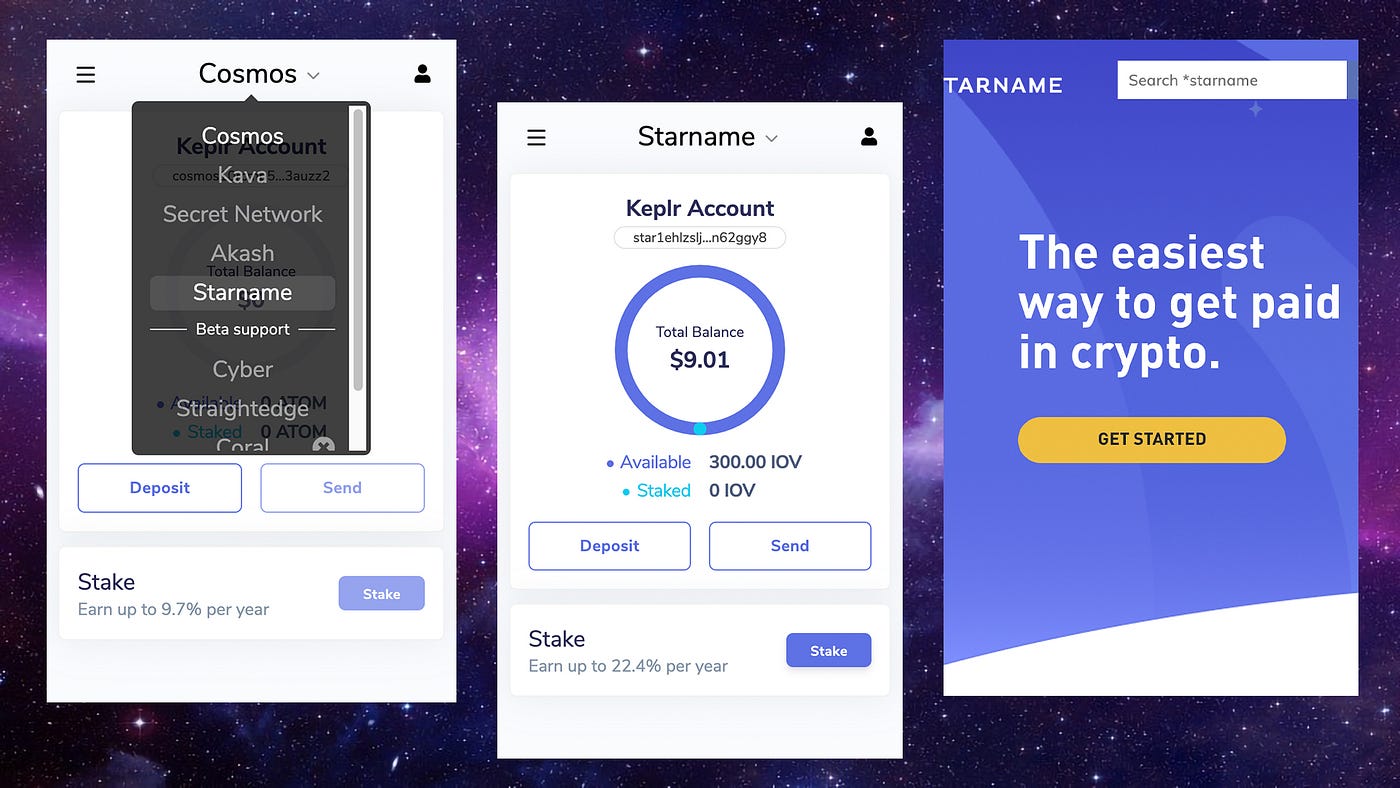
- Login to Keplr Extension and select [Starname] from the networks drop-down menu. Hither you tin view your account details and manage your $IOV every bit explained in the section [Get started with Keplr Browser Extension ] of this tutorial. Retrieve that to complete the side by side steps yous must have tokens available in your residuum.
- Go to https://starname.me/ and click on the yellow push [Get Started].
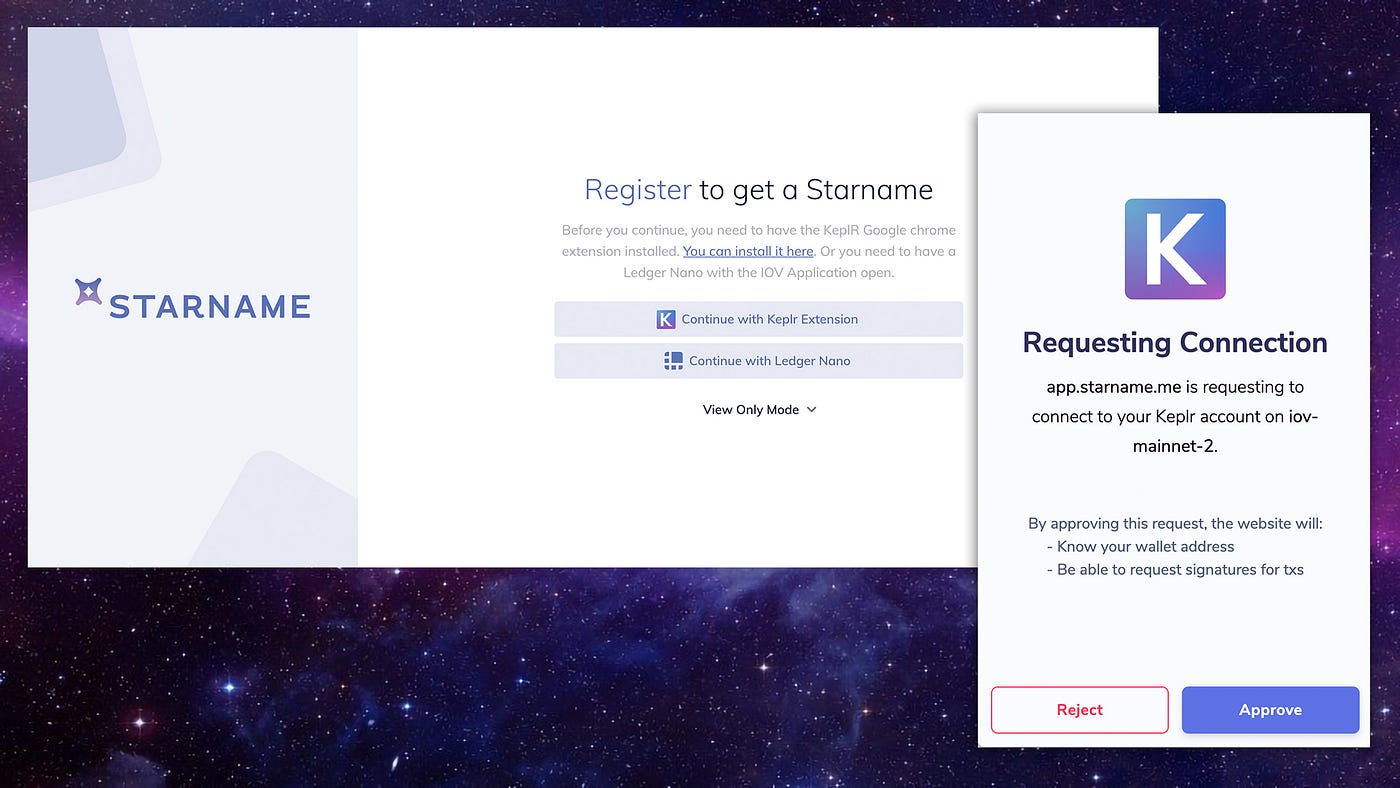
- Yous will be automatically redirected to the page https://app.starname.me/, where you must select the [Go on with Keplr Extension] option.
- Once inside the Starname manager dashboard y'all will be able to choose dissimilar options, including ownership $IOV tokens via Credit Carte du jour, view the transactions made to-and-for your address, and register a Starname. With today'due south tutorial we will focus on this last point.
⭐️ Register your own *Starname
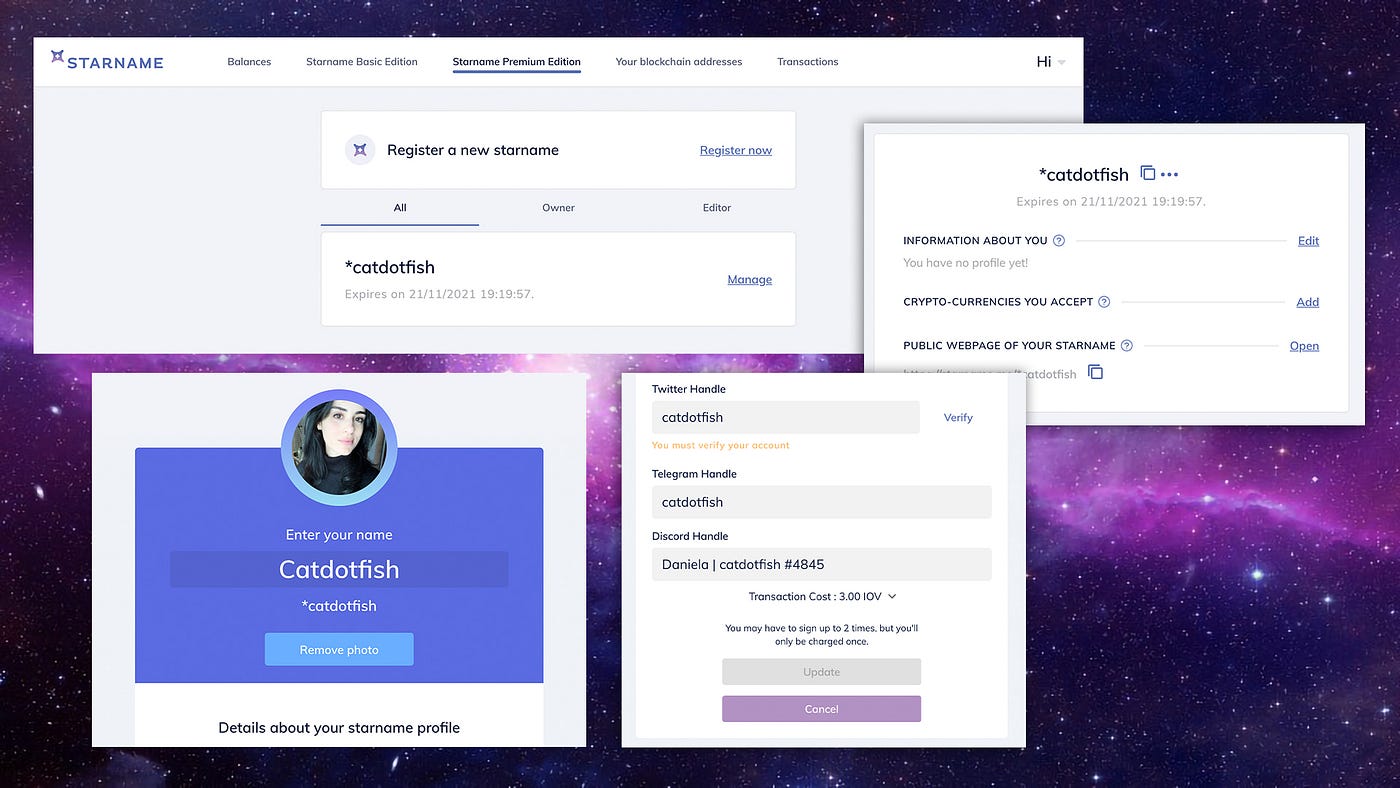
- Once you take successfully accessed the Starname Dashboard, select one of the following options to create your own Starname:
• [Starname Premium Edition] ex *catdotfish (*name)
• [Starname Basic Edition] ex catdotfish*cosmos (proper name*cosmos/iov)
In this guide we will follow the path of [Starname Premium Edition], only the process for purchasing the basic one is the same. - Once in the [Starname Premium Edition] department click on [Register At present].
- Now you accept the possibility to choose your Starname, which will have to be preceded by a * (I have chosen *catdotfish).
If the name y'all selected is not bachelor the box volition plough yellow and you volition not be allowed to continue.
If instead, the proper name you accept called is bachelor, it will announced below the box the cost y'all will have to pay to register this Starname (mine cost 72 $IOV). - If y'all are satisfied with your choice, click [Register].
A Keplr window will automatically open that will allow you to make the on-concatenation transaction. Once the transaction is completed, you volition be immediately informed by the system about its success.
Every bit always, I recommend selecting the transaction [Loftier] fees for amend performance.
💡 Congratulations, with your purchase you have taken another step into the future of the crypto-payments!
Now let's see together how to alter your Starname profile with the Dashboard and acquaintance your new Starname to the addresses available on Keplr.


📸 How to Edit your Starname Profile
- In the [Starname Premium Edition] you should now exist able to view the newly purchased Starname. Click on [Manage] in the corresponding section.
- The first phonation is [Information nearly y'all]. Select [Edit] to customize your Starname profile to your liking.
When writing your Twitter and telegram tags practise non enter @.
In order to associate your contour to your twitter account you will be asked to brand a verification. - When you lot are satisfied with what you typed in your profile, scroll down and select [Update] to display the Keplr window that will allow yous to consummate the operation and save the data on-concatenation.
🤝 How to link your *Starname to your addresses
- In the [Starname Premium Edition] y'all should now be able to view the newly purchased Starname. Click on [Manage] in the corresponding section.
- Select [Edit] next to [Crypto-Currencies y'all accept].
- At present click in the box where you encounter [Algorand]: this volition open up the selection of all the bondage that currently back up this feature.
Select ane by i the chains whose addresses yous want to link to your new Starname past adding new spaces with the [+ Add More] button.
Every bit you lot can see I have selected [IoV], [Cosmos], [Cloak-and-dagger] and [Kava]. - To notice the addresses to be associated, open up the window of your Keplr Extension and once selected the desired network, click on the address: it will be automatically copied assuasive you to paste it in the corresponding department in the Starname Dashboard.
- When you are satisfied, scroll down and select [Salve] to display the Keplr window that will allow yous to complete the operation on-chain.
🚀 Now Yous're All Fix!
Stay updated then you don't miss out on any of the opportunities fabricated possible by using Keplr and Starname!
Are you curious to acquire more about Starname?
Here are the articles for yous:
- The Rising of the Starname
- The Starname and the IOV token
Source: https://medium.com/chainapsis/how-to-use-keplr-wallet-40afc80907f6
0 Response to "If I Have Already Voted Do I Need to Register Again"
Post a Comment